

Paint by Numbers FAQ: 15 Common Questions Answered
- by Paint by number online
-

Paint by numbers is a simple and enjoyable way to create art, even if you've never painted before. The process involves filling in numbered sections of a canvas with corresponding paint colors to reveal a complete image. This guide answers 15 frequently asked questions to help beginners and enthusiasts get started, improve techniques, and preserve their finished artwork.
Highlights:
- What is it? A structured art activity where you paint numbered sections with matching colors.
- Why do it? It's relaxing, reduces stress, and helps build focus and fine motor skills.
- Who can try it? Anyone - kids, adults, beginners, or experienced painters.
- What do you need? A kit with a pre-printed canvas, acrylic paints, and brushes.
- How long does it take? Standard kits take 6–12 hours; more complex designs take longer.
- Tips for success: Start from the top, work with one color at a time, and clean brushes between colors.
- Finishing touches: Use a sealer to protect your painting and enhance its appearance.
Whether you're looking for a new hobby or a way to unwind, paint by numbers offers an easy and enjoyable path to creating your own masterpiece.
Paint by Numbers: Step-by-Step Guide from Setup to Finished Artwork
How to Choose a Paint by Numbers Kit
What Should Beginners Look for in a Kit?
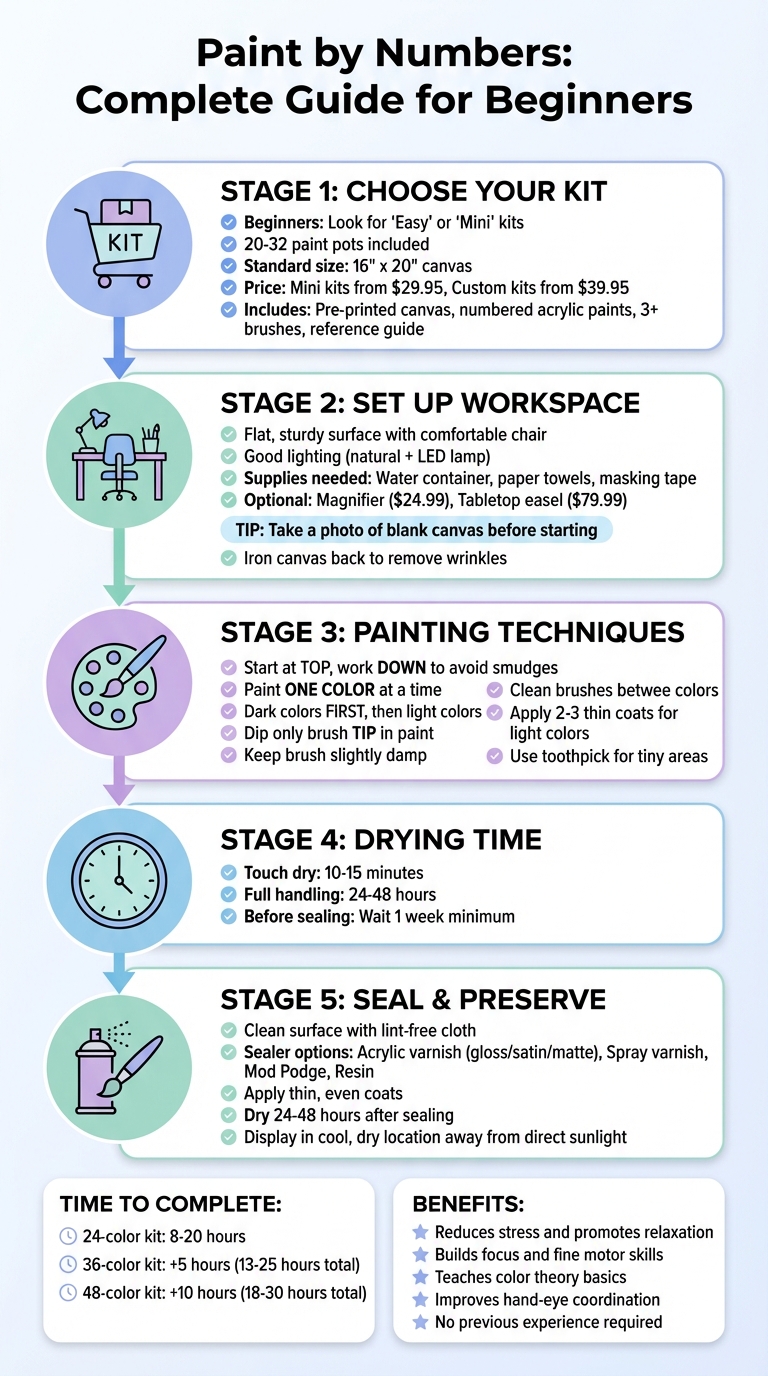
If you’re new to Paint by Numbers, start with a kit labeled "Easy" or "Mini." These kits are designed with larger numbered sections and a simpler layout, typically offering between 20 and 32 paint pots. Look for a kit that includes everything you need: a pre-printed canvas, numbered acrylic paints, at least three brushes of varying sizes, and a reference guide. For better results, opt for paints marked as "opaque" to ensure they fully cover the numbers and lines on the canvas. Also, choose a canvas made from high-quality, finely woven cotton or linen for smoother paint application and better absorption.
Before starting, take a photo of the blank canvas as a backup in case you need to reference the original design later. Mini kits are a budget-friendly way to get started, with prices starting around $29.95. Once you’ve chosen the right kit, focus on finding a design that excites you.
How to Pick a Design You'll Enjoy
The design you choose can make or break your experience, so go for something that sparks your interest - a peaceful landscape, a favorite animal, or anything that holds personal meaning. Beginners may want to start with simpler designs that have fewer colors, as these are less overwhelming and help build confidence.
Paint by Numbers Online offers an easy way to browse designs by difficulty level and theme. You can even upload your own photo to create a custom kit, with prices for personalized options starting around $39.95. The most important thing is to pick a design that will keep you motivated throughout the process. Once you’ve settled on a design, it’s time to familiarize yourself with what’s included in your kit.
What Comes in a Paint by Numbers Kit?
A typical kit includes a pre-printed, numbered canvas - often sized at 16" x 20" - and a reference sheet showing the completed image. The acrylic paints provided are water-based and non-toxic, drying in just 10 to 15 minutes. Premium kits often come with extra features like hanging hardware so you can display your finished artwork right away.
For the best painting experience, look for kits that include artist-grade linen or cotton blend canvases, as these allow for smoother brushstrokes and better paint adhesion. Detail brushes are especially helpful for tackling smaller, intricate sections, while the reference sheet can guide you if you accidentally paint over a number.
sbb-itb-68cf19f
How to Set Up Your Workspace
What Extra Supplies Do You Need?
While your kit includes the basics, a few extra supplies can make your painting sessions smoother. Keep a small container of warm water handy for rinsing brushes between colors, and have paper towels or rags ready for drying brushes or cleaning up spills. To protect your workspace, cover your table with old newspapers, a plastic tablecloth, or even a piece of cardboard.
For finer details, a magnifier (around $24.99) can help you clearly see those tiny numbered sections. Toothpicks can also come in handy for filling in areas too small for your brushes. Use masking tape to secure your canvas to the table - it keeps everything in place without leaving sticky residue. If you plan on painting for extended periods, consider investing in a tabletop adjustable easel (approximately $79.99) to reduce neck strain.
With these supplies in place, you're ready to set up your workspace for maximum efficiency.
How to Organize Your Painting Area
A well-organized workspace can make all the difference. Start with a sturdy, flat surface like a desk or table, paired with a comfortable chair to minimize physical strain. Since good lighting is essential for working on small, detailed sections, supplement natural light with a flexible desk lamp or an LED light positioned directly over your canvas.
Keep your supplies within easy reach and arrange them in a way that allows you to work comfortably. To avoid smudging, try to work methodically in one direction. Alternating between painting flat on the table and using a tabletop easel can also help reduce fatigue by varying your posture.
Do You Need to Prepare the Canvas First?
A smooth canvas is essential for precise painting. Before you begin, iron the back of the canvas to remove any wrinkles. Use masking tape to secure the edges of the canvas to your work surface or a foam board. This not only keeps the canvas stable but also makes it easier to move if needed.
"Take a digital picture of your canvas with your phone! This will give you a permanent reference sheet that you can never misplace, spill paint on, tear, burn, crumple, or shred!" - My Paint by Numbers Support Staff
Snapping a photo before you start is a smart move. It allows you to zoom in on tiny numbers with your phone, which is especially helpful if you accidentally paint over one. There's no need to prep the canvas with gesso or other primers - the acrylic paints in your kit are designed to work perfectly with the pre-printed surface.
Top 10 Easy Paint By Number Tips To Help You Succeed
Painting Techniques and Tips
Make the most of your paint-by-numbers project with these practical techniques and tips to elevate your artwork.
What Order Should You Paint In?
Choosing the right painting order can make a big difference in your results. Start at the top of the canvas and work your way down to avoid smudging wet paint. If you're right-handed, paint from the top-left to the bottom-right; left-handed painters should reverse this direction for the same reason.
Stick to one color at a time to keep your paints from drying out. As the Support Staff at My Paint by Numbers advises:
We highly recommend going one number at a time to prevent the paints from drying.
Another helpful tip is to start with darker colors before moving on to lighter ones. Darker shades help define shadows and structure, and they’re more forgiving if you accidentally paint outside the lines. Some artists also like to begin with the smallest, most detailed areas first while their hands are at their steadiest.
Once you've got your painting order down, it's time to refine your brush technique.
How to Use and Care for Your Brushes
Proper brush handling is key to keeping your strokes clean and precise. Dip only the tip of your brush into the paint to avoid overloading it, which can lead to messy edges. For smoother application, keep your brush slightly damp - just dip it in water briefly, blot off the excess with a paper towel, and you’re good to go. This method helps the paint glide across the canvas more evenly.
Be sure to clean your brushes thoroughly when switching colors. Acrylic paint dries quickly, often within 10 to 15 minutes, so don’t let it harden on the bristles. If water alone doesn’t do the trick, use a little mild soap. After cleaning, reshape the brush head with your fingers and lay it flat on a paper towel to dry. Never leave brushes soaking in water or resting on their bristles, as this can ruin their shape permanently.
Once your brushes are in top condition, you can focus on hiding those printed guides on the canvas.
How to Hide Numbers and Lines Completely
Lighter colors, like yellow or pale pink, can sometimes struggle to cover the printed numbers on the canvas. To address this, use a white-out pen, white paint marker, or white colored pencil to mask the numbers before painting. For all colors, apply a generous amount of paint to create a solid, even layer.
If one coat doesn’t fully cover the guide, apply multiple thin coats instead of one thick layer to avoid a clumpy finish. Start with a thin coat, let it dry completely (10 to 15 minutes), and then add another thicker coat. As Masterpiece By Numbers explains:
Most colors will cover opaquely in one coat, however, some light colors may need two coats to achieve an opaque coverage.
For tiny, hard-to-reach areas, a toothpick can be a lifesaver. Use it to dot the paint with precision where even the smallest brush won’t fit. Be gentle when applying paint to avoid scratching the canvas, as scratches can cause the paint to flake and expose the numbers underneath. If your paint starts to thicken, mix in a drop or two of warm water to restore its smooth texture.
With these tips, you’ll be well on your way to creating a polished, professional-looking masterpiece.
How to Finish and Preserve Your Painting
You've poured your creativity into a beautiful piece of art - now it’s time to protect it so it stands the test of time.
How to Dry and Protect Your Finished Painting
Acrylic paint might feel dry to the touch in just 10–15 minutes, but it’s important to let it cure completely. Allow 24–48 hours for full drying before handling, and wait at least a week before applying a protective sealer. Jumping the gun could lead to smudging or uneven sealing, so patience is key.
Before sealing, gently clean the surface of your canvas with a lint-free cloth or paper towel to remove any dust or debris. If you spot rough patches, lightly sand them with fine-grit sandpaper for a smoother finish. Adding a sealant not only protects your artwork from dust, moisture, and UV rays but also enhances its colors, making them appear more vibrant and rich.
When choosing a sealer, consider the finish you want:
- Acrylic varnish: Available in gloss, satin, or matte, it dries quickly and is easy to apply.
- Spray varnish: Perfect for large pieces or detailed work, it ensures even coverage without brush strokes.
- Mod Podge: A simple option for beginners, it can be applied with a brush or sponge.
- Resin: For a sleek, glass-like finish, resin offers unmatched durability but requires careful mixing and application.
Apply the sealer in thin, even coats, working methodically from one corner to the other. Avoid thick layers, as they can dry unevenly or look cloudy. Stir the sealer gently instead of shaking it to prevent air bubbles. After sealing, let your painting dry for another 24–48 hours to fully set the protective layer.
When it’s time to display your work, choose a cool, dry location like a living room or bedroom. Keep it out of direct sunlight and high-humidity areas (like kitchens or bathrooms) to prevent fading or mildew. If framing with glass, use a mat to keep the painting from touching the glass. For storage, lay your artwork flat in a dry, dark area like a closet, and check on it every six months for any signs of mold or discoloration. These steps will help your masterpiece stay vibrant and well-preserved.
Are the Paints Safe to Use?
When it comes to safety, acrylic paints used in paint-by-numbers kits are a great choice. They’re water-based, non-toxic, and safe for everyday use.
"Acrylic paints offer a non-toxic alternative that is better for the environment as well as human health."
Unlike oil paints, which often require harsh solvents and emit strong fumes, acrylics are safer for both you and the planet. Despite their gentler formula, high-quality acrylics deliver rich pigments comparable to professional oil paints. They also have the added benefit of being more durable over time, as oil paints can decay faster due to their organic makeup.
What Skills Can You Learn from Paint by Numbers?
Paint by numbers isn’t just a relaxing hobby - it’s a hands-on way to build artistic skills. It sharpens hand-eye coordination and improves brush control while also teaching the basics of color theory. As you match and blend numbered colors, you’ll start to see how different shades interact to create depth and dimension.
Beyond technique, this activity fosters patience and focus. Completing a painting requires sustained attention and discipline, skills that can translate into other areas of life. Whether you’re a total beginner or someone with a bit of artistic background, paint by numbers offers a structured way to practice and grow while producing something you can be proud of.
Start Your Paint by Numbers Project
Ready to dive into your first paint-by-numbers project? Here's how to get started: pick the perfect kit, set up your workspace, get comfortable with your brushes, and learn how to preserve your finished masterpiece.
A standard 24-color kit typically takes 8–20 hours to complete. If you're up for a bit more of a challenge, 36-color kits might add roughly 5 extra hours, while 48-color designs could take an additional 10 hours to finish. Choose a design that fits your skill level and interests to ensure an enjoyable experience.
"Painting with numbers is a technique by which the canvas is divided into numbered sections... No previous experience is required; You just need to bring out your inner artist!" – Canvas by Numbers
As you work through your painting, keep in mind that precision is key. Starting at the top of the canvas and working downward can help prevent smudges. Between sessions, make sure to seal your paints tightly and clean your brushes thoroughly when switching colors. Allowing each layer to dry fully before moving on will give your work a smooth, polished look.
Paint by Numbers Online offers kits for every skill level. Whether you're a beginner or a seasoned painter looking for a more intricate design, browse their collection to find the perfect kit for you.
FAQs
What can I do to make my paint-by-numbers artwork look more professional?
To give your paint-by-numbers artwork a polished finish, there are a few techniques worth focusing on. Start by carefully matching each numbered section to its corresponding paint color. This ensures your painting stays accurate and clear. Using good-quality brushes and paints can also make a noticeable difference, as they allow for smoother strokes and finer details.
Before you begin, prep your canvas with a thin layer of clear gesso. This step helps the paint stick better and creates a smoother surface to work on. Choose a well-lit, comfortable space, and start painting from the top of the canvas, working your way down to avoid accidental smudges. Keep your brushes clean by washing them frequently - this prevents unwanted color mixing.
For a richer, more vibrant finish, consider applying a second coat of paint. This adds depth and enhances the overall color. By taking your time and focusing on the details, you can create a final piece that looks polished and eye-catching.
How can I protect and preserve my completed paint by numbers artwork?
To ensure your finished paint-by-numbers artwork stays in top condition, allow it to dry completely before moving on to preservation steps. Applying a clear protective varnish can help shield it from dust, moisture, and UV-related fading. After sealing, choose a display or storage spot that avoids direct sunlight and high humidity, as these can cause long-term damage. For an extra layer of protection and a polished look, frame your artwork under glass. This not only keeps it safe but also enhances its overall presentation.
How can I pick the best paint-by-numbers kit for my skill level?
Choosing the right paint-by-numbers kit comes down to your skill level and personal interests.
For beginners, it's best to start with simpler designs that use fewer colors. These are easier to manage and help you build confidence as you get the hang of it. Themes like landscapes, animals, or flowers are popular choices because they’re engaging and fun to work on.
If you’re more advanced, go for kits with more intricate details and a wider range of colors. These can offer a greater challenge and allow you to create artwork with more depth and complexity. Whatever your skill level, pick a subject that genuinely excites you - it’ll make the entire experience much more enjoyable!