

Ultimate Guide to Custom Paint by Numbers Kits
- by Paint by number online
-

Custom paint-by-numbers kits let you turn personal photos into paintable art, making it easy for anyone to create something meaningful. These kits include a numbered canvas, pre-mixed paints, and brushes - all tailored to your chosen image. Whether you're painting a pet, a family moment, or a favorite memory, the process is simple and stress-relieving, even for beginners.
Key Points:
- How It Works: Upload a high-resolution photo, and it’s transformed into a numbered canvas with matching paints.
- Why It’s Popular: Offers a relaxing activity while recreating cherished memories.
- Beginner-Friendly: Kits are available with varying levels of detail (12–48 colors).
- Setup & Tools: Comes with canvas, paints, brushes, and instructions. Ensure proper lighting and workspace for the best experience.
- Painting Tips: Start with darker colors, use blending techniques, and fix mistakes easily with acrylic paint.
- Finishing Touches: Seal your artwork with varnish, frame it, and protect it from sunlight and moisture for long-term preservation.
These kits are perfect for creating personalized art, gifting, or simply enjoying a calming hobby.
How to Turn Your Photos into Paint By Number Paintings final
sbb-itb-68cf19f
How to Create Your Custom Paint by Numbers Kit
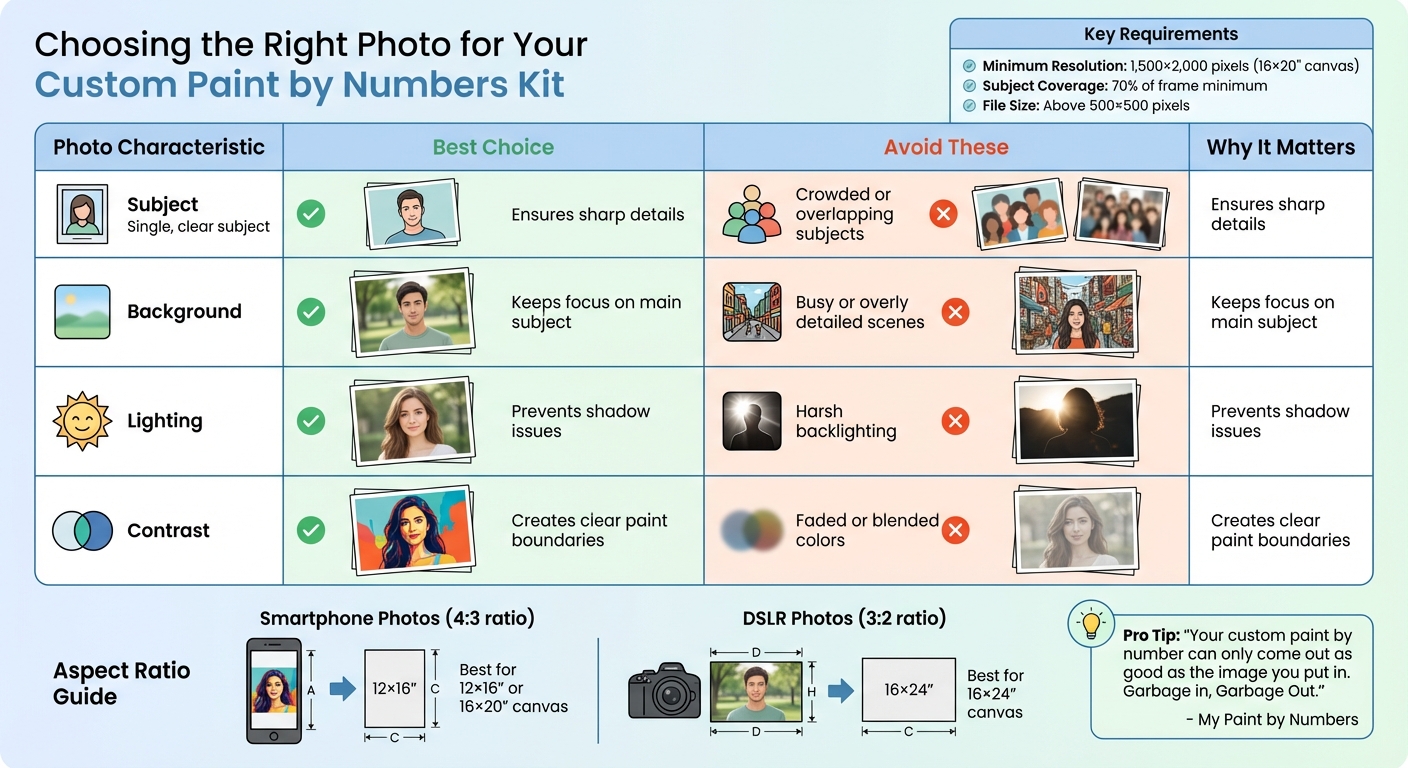
Photo Selection Guide for Custom Paint by Numbers Kits
Making your custom kit at Paint by Numbers Online is simple, but the quality of your final painting depends heavily on the photo you choose. Here's a step-by-step guide to help you pick the right image and navigate the creation process.
Choosing the Right Photo for Your Kit
The first step to a great custom kit is selecting a clear, high-resolution photo. Ideally, your image should be at least 1,500x2,000 pixels for a 16x20-inch canvas. Anything below 500x500 pixels risks looking pixelated when printed.
"Your custom paint by number can only come out as good as the image you put in. As our MPBN accountants say, 'Garbage in, Garbage Out.'" – My Paint by Numbers
To check your photo's resolution, look at the file properties on your device (use 'Details' on Windows or 'Get Info' on Mac).
Lighting and contrast are equally important. Opt for photos with even, natural lighting - preferably with the light source behind the camera. Avoid backlit subjects or heavy shadows, especially on faces. For best results, ensure your subject takes up at least 70% of the frame to keep the details sharp.
The aspect ratio of your photo matters too. Match your image dimensions to the canvas size you want to avoid cropping out important parts. Smartphone photos (4:3 ratio) work well for kits sized 12x16 or 16x20 inches, while DSLR photos (3:2 ratio) are ideal for larger canvases, such as 16x24 inches.
| Photo Characteristic | Best Choice | Avoid These |
|---|---|---|
| Subject | Single, clear subject | Crowded or overlapping subjects |
| Background | Simple or blurred | Busy or overly detailed scenes |
| Lighting | Even, natural light | Harsh backlighting |
| Contrast | Defined edges and colors | Faded or blended colors |
If your image includes intricate details, choose a larger canvas - at least 16x20 inches - to ensure clarity. Cropping your photo to focus on the main subject can also enhance the final result .
Once you've selected the perfect photo, it’s time to customize your kit.
Custom Kit Creation Process at Paint by Numbers Online
After uploading your chosen photo, pick a canvas size that complements your image. Paint by Numbers Online offers various dimensions, allowing you to match the canvas to your photo's aspect ratio and your painting experience. Larger sizes capture more detail but may require extra time - most kits take between 6 to 12 hours to complete.
You can also select a frame option: rolled canvas, DIY wooden frame, pre-stretched canvas, or canvas board. If you want to start painting right away or frame it later, choose the option that best suits your needs.
Next, decide on the number of colors for your kit. Options include 24, 36, or 48 colors. Beginners might prefer 24 colors for simplicity, while experienced painters can go for 48 colors to achieve a more detailed, lifelike result.
Once your photo is uploaded, professional designers optimize it for production. They adjust the composition to maximize canvas coverage and enhance the final outcome . This step ensures your kit reflects the best possible version of your photo.
The image is then converted into a numbered outline on a high-quality linen canvas. A custom palette of acrylic paints is mixed to match your photo’s colors. Your kit will include everything you need: the numbered canvas, pre-mixed paints, brushes (usually 3 to 6), a color reference card, and detailed instructions.
Shipping typically takes 7 to 14 business days, though custom orders with complex designs may require 3 to 5 weeks . Once your kit arrives, set up your workspace to dive into your painting project!
Getting Started: Tools, Workspace, and Preparation
Your custom kit has arrived! It's time to unpack and set up your workspace. A proper setup can make all the difference in avoiding mistakes and ensuring a smooth painting experience.
What's Included in Paint by Numbers Online Kits?
Each Paint by Numbers Online custom kit comes with everything you need to bring your photo to life as a painting. Here's what you’ll find:
- A numbered linen canvas based on your photo. Depending on your choice, it may arrive rolled in a tube, as a DIY frame kit with wooden stretcher bars, pre-stretched on a frame, or mounted on a canvas board.
- Pre-mixed acrylic paints, each labeled to match the numbers on your canvas.
- Brushes, typically three to six in various sizes, to handle everything from broad strokes to fine details.
- A reference sheet and a color card to guide you as you paint.
- An instruction guide to walk you through the process.
If you opted for a DIY frame kit, you can paint the canvas while it’s flat, then stretch it onto the wooden bars once you’re done. With these tools at hand, you’re ready to create your masterpiece.
Setting Up Your Workspace for Painting
Choose a well-lit area for your painting session - natural light works best, but a good desk lamp will do the trick. For particularly detailed sections, a magnifying glass with LED lights can help you see those tiny numbers more clearly.
To protect your work surface, cover it with disposable paper or a cloth. Use a flat, stable surface and make sure you’re seated comfortably, as painting can take anywhere from 6 to over 60 hours depending on the complexity of your kit.
Here are a few tips to keep your workspace organized and efficient:
- Arrange your paint pots in numerical order before starting.
- Set up a two-cup water system: one cup for rinsing brushes and the other for thinning paints as needed.
- Keep paper towels nearby for quick cleanups.
"An organized workspace isn't just about being tidy - it's about getting into the right headspace. When your tools are ready and waiting, your mind can fully relax into the meditative rhythm of painting." – Paint-by-number.com
If your canvas arrived rolled, gently press it flat before you begin. A well-prepared space not only makes the process easier but also helps you immerse yourself in the calming flow of turning your photo into art.
Painting Techniques for Better Results
With your workspace all set, it’s time to bring your custom kit to life. Using the right painting techniques can elevate your canvas from a basic numbered outline to a polished piece of art.
Basic Techniques for Beginners
Start with darker colors and work your way toward lighter shades. This prevents darker paints from accidentally smudging into lighter areas. To avoid smearing wet paint, paint from the top of the canvas downward. Right-handed artists should paint from left to right, while left-handed painters should go the opposite way.
Focus on completing all areas for one number before switching to the next. This keeps your paint pots from drying out and helps you build a steady rhythm. Use just the tip of your brush for precise strokes, which will help you stay within the lines.
Aim for a paint consistency similar to heavy cream. If it feels too thick, add one or two drops of warm water directly to the pot. For light-colored sections where the printed numbers might peek through, cover them with a small dot of white paint or a white colored pencil before applying your final color.
Before each stroke, dip your brush in water and lightly blot off the excess. If you notice ridges forming while the paint is still wet, gently glide a clean, damp brush parallel to the canvas to smooth them out. For tiny sections that even your finest brush can’t reach, a toothpick works wonders.
Once you’ve mastered these basics, you can move on to techniques that add blending and fine detail to your work.
Advanced Tips for Blending and Detailing
If you want to take your painting to the next level, blending and detailing are key. Blending helps erase those printed borders, creating smooth transitions between colors. In fact, a survey by the Craft & Hobby Association found that 75% of paint-by-numbers enthusiasts said blending was the skill that most improved their results.
For wet-on-wet blending, apply two adjacent colors while they’re still wet, then use a soft brush to feather the edges until the border disappears. Work in small sections, about 1 to 2 square inches, since acrylic paint dries quickly. A light mist of water or a bit of acrylic medium can give you more time to blend. For glazing, mix equal parts acrylic medium and paint to create a translucent layer over dry sections, adding subtle color shifts.
To add fine details like fur or hair, try dry brushing. Dip your brush in paint, then wipe most of it off, leaving only a hint of pigment. Lightly drag the brush over the canvas so the color clings only to raised textures.
If blending starts to look muddy, let the area dry completely and then apply a thin layer of fresh color to restore its vibrancy. Avoid wiping wet paint - it will only smear.
Fixing Common Painting Problems
Mistakes happen, but acrylic paint is forgiving. Here’s how to handle common issues without derailing your progress:
| Common Mistake | Recommended Fix | Tool Needed |
|---|---|---|
| Wrong Color | Let dry, then layer correct color or white primer | Fine brush, white paint |
| Outside the Lines | Wipe immediately (if wet) or paint over (if dry) | Damp Q-tip or small brush |
| Visible Numbers | Cover with white paint or white pencil before coloring | White paint or white pencil |
| Uneven Coverage | Apply a second thin coat after the first dries | Small flat brush |
| Dried Paint Pot | Add 1–2 drops of warm water and stir | Toothpick or brush handle |
For wet spills, use a damp cotton swab to lift the paint straight up. Avoid rubbing sideways, as this can spread the paint into other sections. If paint dries outside the lines, use a small brush dipped in water to clean up the edges, then touch up with the correct background color.
If dried paint creates ridges, gently sand the area with 600-grit sandpaper, clean off the dust, and apply a thin coat of matching paint. For patchy or uneven coverage, simply add another thin coat after the first layer dries completely.
With these techniques in hand, even the smallest challenges can be addressed, leaving you free to focus on creating something you’re proud of.
Displaying and Preserving Your Finished Artwork
Once you've mastered your painting techniques, how you display and care for your artwork becomes just as important. Proper display and preservation ensure your finished pieces remain vibrant and protected for years to come.
Framing and Mounting Your Artwork
Start by sealing your dried painting with a clear varnish. This step protects against UV light, keeps dust away, and enhances the colors. As one expert puts it:
"Sealing your dried acrylic painting with a clear 'varnish' is an essential step that professionals never skip."
When it comes to framing, stretching the canvas over wooden bars is the most common method. Secure the canvas with staples, working outward from the center of each side. If you're looking for a modern touch, consider a floating frame. These frames create a subtle 0.2–0.4 inch shadow gap, adding depth without drawing attention away from the art. As Dmytro, Curator at Jose Art Gallery, explains:
"A great frame is invisible. You notice the art - and only later realize the frame was guiding your eye the whole time."
If you prefer a traditional frame, avoid using glass or plexiglass. Acrylic paint needs airflow, and trapped moisture behind glass can damage your work over time. Standard canvas sizes like 16x20 inches fit readily available store-bought frames, making them a convenient option. For heavier frames, skip the single center wire and opt for two D-rings with two wall hooks to keep the frame level and secure.
Once your artwork is framed or mounted, the next step is ensuring its long-term preservation.
Caring for and Preserving Your Painting
Before handling or framing, allow your painting to dry completely for 24–48 hours. When applying varnish, use several thin coats rather than one thick layer to avoid a cloudy finish. Choose a varnish finish - gloss, satin, or matte - based on the lighting in the room where the painting will be displayed.
To protect your artwork, keep it out of direct sunlight to prevent fading. Avoid hanging it in areas with high humidity, like kitchens or bathrooms, as moisture can lead to buckling or mildew. For cleaning, use a soft, lint-free cloth or a dry microfiber brush. Never spray water or cleaning solutions directly onto the painting.
If you need to store unframed canvases, place acid-free tissue paper between each piece to prevent sticking. For compact storage, roll the canvas with the painted side facing outward to avoid cracking. Check stored artwork every six months for signs of discoloration or damage.
Conclusion
Custom paint-by-numbers kits turn your treasured memories into finished artwork, no matter your experience with painting. Whether it’s a picture of your pet, a family portrait, or a favorite vacation scene, the numbered guide simplifies the technical aspects, letting you focus entirely on the joy of creating.
Once your photo is transformed into a personalized kit, the creative journey begins. As Pablo Picasso once said:
"Art washes away from the soul the dust of everyday life."
Through this process, you’ll naturally pick up skills like brush control, color layering, and blending. Many people complete their first kit in just 6 to 12 hours. Plus, each kit includes everything you need: a high-quality canvas, pre-mixed acrylic paints, and brushes. For the best results, start with a high-resolution photo that has a clear focal point and strong contrast.
The most rewarding part? Watching your photo come alive, stroke by stroke. Once finished, your masterpiece is ready to be framed, displayed, or gifted. With a touch of varnish, it will stay vibrant for years to come.
Whether you’re looking for a relaxing hobby, a chance to learn new skills, or a meaningful gift idea, custom paint-by-numbers kits provide a fulfilling way to reconnect with your favorite memories while immersing yourself in the world of art.
FAQs
What’s the best way to choose a photo for my custom paint-by-numbers kit?
To choose the ideal photo for your custom paint-by-numbers kit, start with a high-resolution image - at least 500 pixels - to capture fine details on your canvas. Pick a photo where the main subject takes up most of the frame. This helps reduce distractions from the background and keeps the focus on the key parts of the image.
Look for a photo with good lighting and strong contrast, as this makes it easier to translate into a painting. Additionally, ensure the photo’s aspect ratio matches the size of your canvas to prevent any unwanted cropping or stretching. These simple tips will set you up for a fun and visually striking painting experience.
What techniques can I use to make my paint-by-numbers artwork look more professional?
To elevate your paint-by-numbers artwork, try adding a few advanced techniques to your process. Blending can help you create smooth transitions between colors, giving your work more depth and a lifelike quality. You can do this by gently mixing neighboring colors directly on the canvas or softening edges with a slightly damp brush.
Another technique to consider is flattening, which involves smoothing out brushstrokes for a clean, even finish. This works particularly well for large areas or backgrounds where a polished appearance is important. For finer details, experiment with layering - applying thin, transparent layers of paint to build up richer colors and a luminous effect. These methods might take a bit of practice, but they can make a noticeable difference in the final result of your artwork.
What’s the best way to protect and display my finished paint-by-numbers artwork?
To keep your paint-by-numbers masterpiece looking its best, start by letting the painting dry completely - this usually takes about 24–48 hours for acrylic paints. Once it's dry, apply a clear protective varnish. This will help guard against dust, moisture, and UV rays, ensuring your artwork stays in great condition.
When it comes to displaying your work, framing is a great option. Use acid-free materials and UV-protective glass to prevent fading and deterioration over time. Be sure to hang or place the framed piece in a cool, dry spot, away from direct sunlight and extreme temperature swings. By taking these steps, you'll not only preserve your painting but also showcase it as a stunning piece of decor or a cherished memory.