

Best Tools for Transferring Designs to Canvas
- by Paint by number online
-

Getting your design onto a canvas accurately can make or break your painting process. This guide covers the top five methods to transfer designs based on your needs, budget, and project size:
- Tracing Paper: Affordable and simple for small to medium works.
- Graphite Transfer Paper: Quick and clean, ideal for precise lines.
- DIY Transfer Paper: Budget-friendly using basic art supplies.
- Projectors: Best for large-scale or detailed designs.
- Direct Drawing: Freehand approach for spontaneous designs.
Each method has its pros and cons, with tracing and graphite paper being easy to use, projectors offering high accuracy, and DIY or direct drawing suiting specific preferences.
Quick Comparison
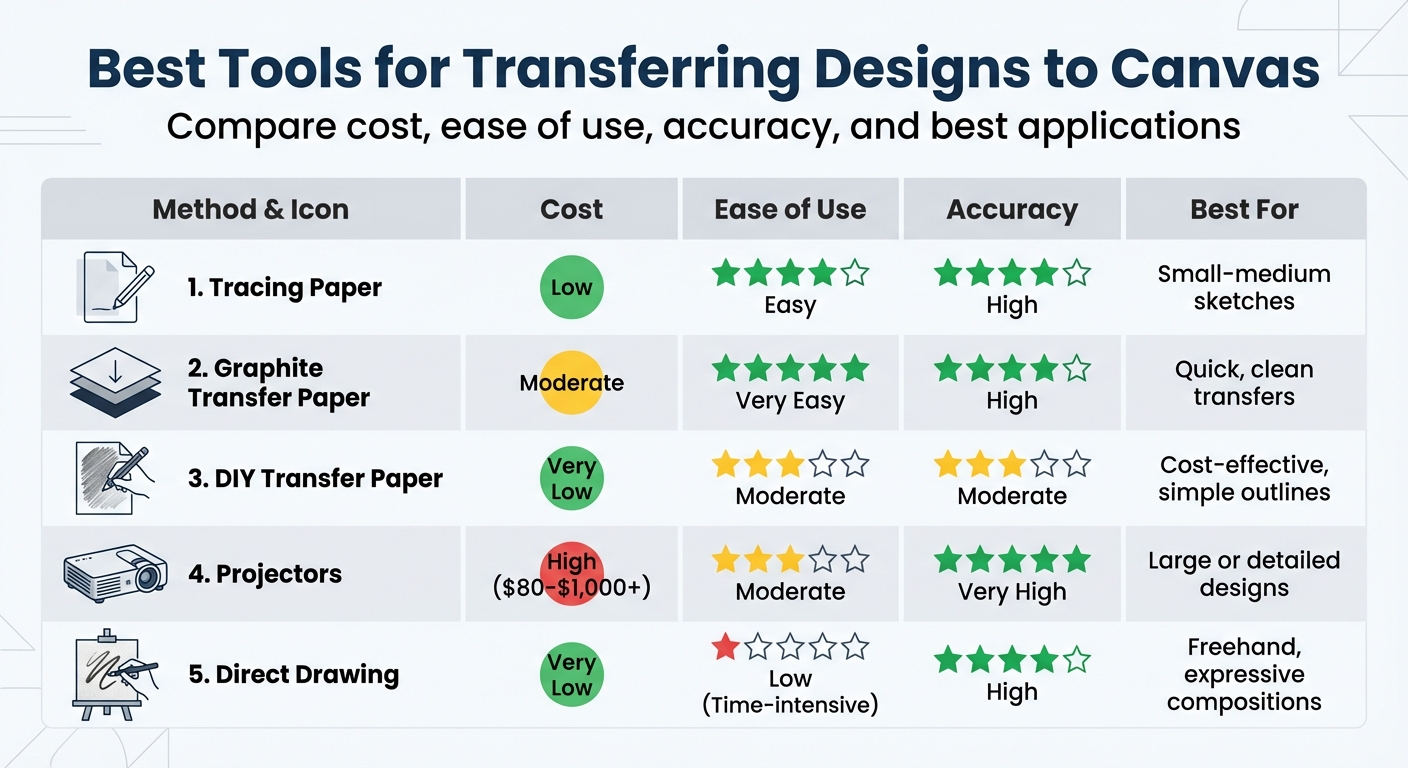
| Method | Cost | Ease of Use | Accuracy | Best For |
|---|---|---|---|---|
| Tracing Paper | Low | Easy | High | Small-medium sketches |
| Graphite Paper | Moderate | Very Easy | High | Quick, clean transfers |
| DIY Transfer Paper | Very Low | Moderate | Moderate | Cost-effective, simple outlines |
| Projectors | High | Moderate | Very High | Large or detailed designs |
| Direct Drawing | Very Low | Low | High | Freehand, expressive compositions |
Choose the method that matches your project’s size, complexity, and your comfort level. Read on for step-by-step instructions and tips for each technique.
Comparison of 5 Canvas Design Transfer Methods: Cost, Ease, and Accuracy
Every Way to Transfer a Drawing on a Canvas for Painting (7 Ways) - Oil Painting For Beginners
sbb-itb-68cf19f
Tracing Paper: A Classic Method
Tracing paper is a simple yet effective way to transfer graphite sketches onto a canvas without causing damage or requiring expensive tools. It’s a practical option for those who appreciate traditional methods, offering a straightforward alternative to digital solutions.
"Tracing paper is a semi-transparent paper you can use to trace an image or drawing... you can easily transfer it to another piece of paper or even a canvas without having to erase and redraw it over and over again"
- Kathy Leader, Artist
How to Use Tracing Paper
Using tracing paper is straightforward. Start by placing the tracing paper over your original drawing, securing it with tape to keep it steady. Then, take a soft graphite pencil (2B or 3B is ideal) and carefully trace the main outlines of your design. Softer graphite pencils work better because they transfer more easily than harder ones.
Once your tracing is complete, flip the paper so that the graphite side faces the canvas. Align it carefully, tape it in place, and use a ballpoint pen or the blunt end of a marker to rub firmly over the back of the tracing paper. Kathy Leader emphasizes:
"Press hard on the lines so that the graphite transfers to the paper."
For best results, work from top to bottom to avoid smudges, and place a clean sheet of paper under your hand to protect the canvas from oils. Before removing the tape, lift one corner of the tracing paper to ensure the lines have transferred clearly. If they appear faint, press down again and increase the pressure.
To prevent a mirrored image, make sure to trace the design on the front of the paper, then flip it and coat the back with graphite before transferring.
Benefits and When to Use It
Once your design is successfully transferred, you’ll notice several advantages of using tracing paper.
- Cost-effective and reusable: Tracing paper is inexpensive and can be reused for multiple transfers, though you may need to retrace if the graphite fades.
- Clean and flexible: Unlike carbon paper, which can leave waxy, permanent marks, tracing paper produces light graphite lines that are easy to erase or paint over.
- Versatile: It’s great for detailed work and works best on primed, lightly sanded canvases, where the smooth surface ensures clear line transfers.
- Substitutes available: If professional tracing paper isn’t on hand, culinary parchment paper can work in a pinch.
- No complex setup: Compared to digital projectors, tracing paper is simple, accurate, and doesn’t require extra equipment or setup time.
Tracing paper is an excellent choice for artists who value precision and simplicity, making it a go-to tool for transferring designs with ease.
Graphite Transfer Paper: Quick and Clear
Graphite transfer paper serves as a bridge between your design and your canvas. When you trace over your pattern, the graphite coating on the underside transfers directly onto the surface, creating clean, erasable lines. This sets it apart from traditional carbon paper, which often leaves waxy, permanent marks that are harder to work with.
"Graphite transfer paper could very well be the best friend of many artists and craftspeople, making their projects much easier to complete."
One of its standout features is its reusability. A single sheet can be used multiple times, often transferring hundreds of images before the coating wears off. Its versatility extends to various surfaces, including primed canvas, wood, glass, cardboard, and ceramics, making it an essential tool for a wide range of creative projects. The result? Crisp, erasable lines that adapt seamlessly to different materials.
How to Use Graphite Transfer Paper
To get started, layer your canvas on the bottom, place the graphite paper (graphite side down) on top, and then position your design over it. Secure the layers with masking tape to prevent any shifting that might create double lines or misaligned patterns.
When tracing, use a ballpoint pen, stylus, or blunt pencil, applying steady, even pressure. Pressing too lightly may result in faint lines, while pressing too hard can lead to smudges or even indentations on your surface. After transferring, wipe away any excess graphite dust to keep the lines crisp.
For better control, try the "hinge method." Tape one side of your design so you can lift it periodically to check your progress without losing alignment. Work from the top down to avoid smudging completed areas, and place a clean sheet of paper under your hand to protect the surface from skin oils.
Advantages and Drawbacks
Graphite transfer paper outshines traditional tracing paper by offering a faster, cleaner process with easy correction options. Most artists prefer wax-free graphite paper because it produces cleaner, erasable lines with minimal residue. If you need darker lines, waxed versions are an option, but keep in mind that the wax can sometimes interfere with paint adhesion, particularly when working with acrylics. For the best results, wax-free paper is ideal for ensuring smooth paint coverage.
This tool allows for detailed transfers that erase easily with a kneaded eraser. For stubborn smudges, a cotton swab dipped in rubbing alcohol works well. To avoid surprises, always test the transfer on a scrap surface first to check how well the lines erase and to adjust the pressure as needed.
However, there are a few downsides to consider. Residue buildup can occur if excess graphite isn't removed or if you apply too much pressure, leading to smudges that require extra cleanup. Washing your hands after handling the paper is a smart precaution to avoid leaving fingerprints on your canvas.
DIY Transfer Paper: Budget-Friendly Option
Commercial transfer papers are convenient, but creating your own is an affordable way to customize your art projects.
Making DIY transfer paper is simple and cost-effective. All you need are basic art supplies: soft graphite pencils, charcoal sticks, and plain paper. This method is especially useful for larger projects, where buying multiple sheets of commercial transfer paper can get pricey. Plus, DIY transfer paper gives you control over how dark or light the lines appear, depending on the graphite grade you choose. Softer leads like 2B or 3B work best for transferring designs.
Another perk? DIY transfer paper skips the wax, so your lines are easy to erase and your paint will adhere properly to the surface.
How to Make Your Own Transfer Paper
Here’s how to create your own transfer paper:
-
Take your printed design and flip it over. On the back, use a soft charcoal stick or a 2B/3B pencil to heavily coat the areas directly behind the design.
"You don't have to cover the paper completely, just where the drawing is on the other side."
- Kelly Medford, Professional Artist
- Shake off any excess dust and place the paper, graphite-side down, onto your canvas. Secure it with masking tape to prevent shifting.
- Trace the design using a ballpoint pen. This provides firmer and clearer lines compared to a pencil.
- For better adhesion, lightly dampen the graphite with a cotton ball and a small amount of rubbing alcohol.
- Once you’ve transferred the design, remove the paper carefully. If the lines are too dark, use a kneaded eraser to gently blot (not rub) them until they’re as light as you need.
Why Use DIY Transfer Paper
The biggest advantage? It saves you money. While store-bought graphite paper can cost several dollars per sheet, DIY supplies are often things you already have at home. Plus, if the graphite starts to fade, you can simply reapply more and keep using the same sheet.
Cleanup is easy, too. Unlike carbon paper, which leaves permanent marks, pure graphite erases effortlessly. The transferred lines are clear enough to guide your work but light enough to adjust as needed. However, since charcoal smudges easily, be careful not to disturb the surface before securing the lines.
Artist Jeannie Vodden highlights why skipping wax is so important:
"If there is wax in the transfer paper you cannot erase it ever and your lines will show up on your finished painting".
This DIY method not only saves money but also gives you more control over your process, making it a great stepping stone for experimenting with other transfer techniques.
Projectors: High Accuracy for Detailed Designs
When working on larger or more intricate designs, projectors offer a modern alternative to traditional transfer methods. These tools are especially helpful for scaling up detailed artwork without distortion. Unlike manual techniques, projectors ensure your design remains as sharp and precise as it looks on your screen. Many LED projectors can connect directly to smartphones, computers, or memory cards, eliminating the need for printing altogether. This makes them an efficient option for transferring designs with high accuracy onto your canvas.
One standout benefit is their ability to scale designs proportionally without warping. Whether you're enlarging a small sketch to mural size or working on a detailed piece, projectors deliver exceptional precision. Modern LED models, boasting over 2,000 lumens and lifespans exceeding 30,000 hours, ensure clarity even in less-than-perfect lighting conditions.
How to Set Up a Projector for Transfer
To get started, securely mount your projector on a tripod or a stable surface to keep it aligned. Photorealist artist Emile Dillon shared a cautionary tale:
"When using a slide projector you have to be careful of lamp life. I once did a large drawing only to have the lamp burn out right before I was done. You can never line up the image again."
Position your canvas flat against the wall, making sure the projector is perpendicular to its surface. Any tilt can result in "keystoning", where the image appears distorted. Many projectors come with keystone correction features to make minor adjustments digitally. To control the size of your design, adjust the distance between the projector and the canvas, and fine-tune with zoom controls. For the best results, darken the room, though modern LED projectors are better equipped to handle ambient light than older models. Once the alignment looks right, trace the main shapes and contours quickly. Afterward, turn off the projector and refine the details by hand to avoid shadows caused by your own movements.
Best Situations for Using Projectors
Projectors truly shine in specific scenarios. They’re ideal for canvases larger than 18" x 24", making them a go-to choice for murals or wall-sized artwork where manual tracing becomes tedious. They’re also perfect for photorealistic projects that demand precise proportions and intricate details. If you’re working with a complex design featuring tight patterns or fine lines, a projector can save you hours compared to grid methods or freehand sketching.
As for costs, entry-level LED projectors are available for around $80, while basic opaque models can cost as little as $40. For professionals, digital art projectors with advanced features like built-in grid patterns and image controls can exceed $1,000. However, a mid-range LED projector often strikes the right balance between affordability and performance.
Direct Drawing: The Straightforward Approach
Direct drawing means sketching your design directly onto the canvas using tools like pencils, markers, or fine-tipped pens - no transfer paper or projectors involved. If you're comfortable with freehand drawing or if your design can handle slight variations, this method gives you full creative control from the very first mark. While it’s not a substitute for precision tools like projectors in photorealistic work, it’s perfect for expressive, simple compositions or when you want to let your design evolve naturally.
The key is choosing the right tools for your needs. This technique offers a sense of freedom, making it great for artists who enjoy a more organic, hands-on approach.
Recommended Tools for Direct Drawing
Paint markers are a favorite for working directly on canvas. They come in three main types:
- Acrylic paint pens: These provide a shiny finish with rich, opaque color.
- Oil-based paint pens: Sometimes called permanent markers, these resist water, fading, and abrasion, making them durable.
- Water-based paint pens: Versatile but require a sealant to become waterproof.
For detailed work, consider the marker tip type. Extra-fine and fine tips are great for intricate lines, while medium tips can handle both details and larger areas. Brush tips mimic a paintbrush, offering flexibility for both thick and thin strokes. If you're looking for affordable options, Artistro’s 12-pack of Oil-Based Permanent Paint Markers (Medium Tip) costs $12.99, while their 20-pack is priced at $23.99.
To ensure your artwork lasts, avoid dye-based markers, as they don’t hold up well over time. Instead, opt for pigment-based markers that offer better lightfastness. And skip ballpoint pens - they tend to bleed through paint layers and lack archival quality.
Start your sketch with a light HB or #2 pencil for easy adjustments. Once satisfied, go over it with a fine-tipped ink pen to create permanent, smudge-proof lines. Professional artist Kelly Medford advises:
"Spray the charcoal lines with a fixative spray. This will keep them from smudging and keep your drawing in place. It also prevents charcoal from mixing into your paint".
This method is a practical addition to any artist’s toolkit, offering flexibility when precision isn't the top priority.
When Direct Drawing Works Best
Direct drawing shines when creative expression and spontaneity take center stage. It’s perfect for simple designs where exact precision isn’t necessary - think abstract art, loose florals, or expressive portraits where character matters more than photographic accuracy. It’s also handy for quickly blocking in compositions by outlining basic shapes, light, and shadow before adding color.
However, there are some challenges. Drawing directly on raw, unprimed canvas can be tricky due to its absorbent surface. Applying a layer of gesso first will create a smoother, more workable base. Artist Stephanie Weaver explains:
"The smoother the surface the easier the pencil glides across the panel, which is great for the fine details of drawing people's portraits".
For projects requiring exact proportions or high levels of detail, tools like projectors or transfer paper might be a better fit.
Comparison Table of Transfer Methods
Picking the right transfer method comes down to your budget, the size of your project, and how much time you're ready to commit. Each method strikes a different balance between cost, convenience, and precision. Here's a quick comparison:
| Method | Cost | Ease of Use | Accuracy | Best Application |
|---|---|---|---|---|
| Tracing Paper | Low | Easy | High | Small to medium detailed sketches |
| Graphite Transfer Paper | Moderate | Very Easy | High | Quick transfers for small to medium works |
| DIY Transfer Paper | Very Low | Moderate | Moderate | Budget-friendly projects with simple outlines |
| Projectors | High ($80–$1,000+) | Moderate | Very High | Large murals, photorealism, rapid enlargements |
| Direct Drawing | Very Low | Low (Time-intensive) | High | Scaling images without technology; expressive work |
This table gives a snapshot of the pros and cons of each transfer method. Let’s break it down further.
Each approach has its strengths when it comes to transferring designs accurately. For instance, traditional methods like tracing paper and graphite transfer paper are straightforward and work well for smaller projects. They're perfect for beginners who want quick results without much setup.
On the other hand, projectors shine for large-scale projects like murals or photorealistic designs. Entry-level digital LED projectors start at around $80, while more advanced models with features like built-in grids can go beyond $1,000. Keep in mind, though, that even a slight movement of the projector can throw off your alignment, so a stable setup is key.
Finally, direct drawing is ideal for those who want to scale images by hand. While it’s time-intensive, it allows for expressive, technology-free work and offers excellent accuracy for artists who prefer a hands-on approach. Each method serves a specific purpose, so the choice ultimately depends on the demands of your project.
Tips for Successful Design Transfer
Getting a clean and accurate design transfer isn't just about having the right tools - it's also about preparing your canvas and testing your materials beforehand.
Preparing Your Canvas
A well-prepared canvas is the foundation of a smooth transfer. Start by wiping the canvas with a damp cloth to remove any dust or oils, and let it dry completely. For better grip, lightly sand the surface using 220-grit sandpaper. If your design has intricate details, apply a thin coat of primer and let it dry for 2 to 4 hours. Once dry, use a tack cloth or a lint-free rag to remove any lingering dust.
To ensure precision, align your design on the canvas and secure it with masking tape along the edges. Place the canvas on a hard, flat surface to distribute pressure evenly. As artist Kelly Medford points out:
"The transferred lines will be very delicate at this point, so be careful not to rub them with anything or you'll smudge the charcoal".
Once your canvas is ready, it's time to test your materials to avoid any surprises.
Testing Your Materials First
Testing your tools is a crucial step to prevent errors like smudges or unwanted marks. Before committing to the full design, try out your transfer tools on a small, hidden section of the canvas. Ninja Transfers emphasizes this practice:
"Always test on a scrap piece of fabric before starting a production run".
While transferring, lift the paper slightly to check your progress without disturbing the alignment. Secure only the top edge of the design with tape, leaving the bottom and sides free to allow for adjustments. If you notice incomplete lines, re-secure the paper and retrace those areas with consistent pressure. For digital transfers, make sure your image resolution is at least 300 DPI to retain sharpness against the canvas texture.
Once the transfer is finished, take steps to preserve it. Spray delicate charcoal or pencil lines with a fixative to prevent smudging. Alternatively, you can go over the lines with a fine-tipped India ink pen for a permanent, smudge-resistant outline before moving on to painting.
Conclusion
Selecting the right transfer method depends on your project's size, your skill level, and your budget. This guide explored five options: tracing paper for intricate sketches, graphite transfer paper for quick and precise results, DIY transfer paper for cost-effective solutions, projectors for large-scale accuracy, and direct drawing for freehand creativity. Each method offers a unique balance of cost, convenience, and precision to suit different artistic needs.
For beginners, DIY transfer paper is a great starting point. It’s affordable and uses materials you likely already have at home. For more detailed work, graphite transfer paper delivers clean, precise lines without the hassle of smudging. If you're tackling large-scale projects or working with digital images, projectors provide fast and accurate results, though they require a dark space and a bit more investment. Meanwhile, direct drawing is ideal for artists who value spontaneity and expression over exact precision.
As Cowan's Art Knowledge puts it:
"Surface prep and layout is a necessary evil for many of us. It may be necessary, but it doesn't have to be evil".
The key is to experiment with these methods to find the one that fits your workflow. Beginners might find transfer paper or DIY approaches the easiest to start with, while intermediate artists could benefit from using projectors for more intricate or large-scale designs. Always test your method on a scrap surface to avoid surprises.
Whether you're working on a small 8x10" canvas or a massive 7-foot mural, choosing the right technique ensures cleaner and more accurate transfers. And if you're diving into a paint-by-numbers project, consider premium tools and canvases from Paint by Numbers Online (https://paintbynumbersonline.com) to enhance your creative process.
FAQs
Which transfer method is best for acrylic painting on canvas?
When it comes to transferring designs for acrylic painting on canvas, using a projector stands out as an excellent option. It’s especially useful for detailed or large designs, allowing you to trace directly onto the canvas with precision and minimal distortion. This approach is perfect for artists aiming for professional-level accuracy.
If you prefer a simpler, manual method, transfer paper is another reliable choice. This technique doesn’t require any equipment and is great for straightforward designs. While both methods work well, projectors are often the go-to solution for more intricate artwork.
How do I stop transferred lines from smudging while I paint?
To keep your transferred lines intact, apply a thin layer of matte medium by gently dabbing it over the design. This step helps lock the lines in place and reduces the risk of smudging as you paint. Additionally, take your time and address any smudges immediately to preserve the sharpness of your design.
Can I transfer a design onto a rough or unprimed canvas?
Yes, transferring a design onto a rough or unprimed canvas is possible, though it can be a bit trickier. Methods like charcoal, transfer paper, or even a projector can still work on these surfaces. However, keep in mind that the absorbent quality of unprimed canvas might impact how well the design transfers and how it looks in the end. To achieve the best results, it's a good idea to use high-quality tools and materials.