

How to Turn a Photo into a Painting (5 Methods)
- by Paint by number online
-

Transforming photos into paintings is easier than you think. Whether you're looking for a relaxing hands-on activity or quick digital results, there are options for every skill level and goal. Here are five methods to get started:
- Custom Paint-by-Numbers Kits: Upload a photo, receive a kit with paints and canvas, and enjoy painting step-by-step. Ideal for beginners and those seeking a physical artwork.
- Photoshop Filters: Use built-in tools to apply artistic effects like oil painting or watercolor. Perfect for quick digital transformations.
- AI Converters: Online tools like Fotor turn photos into paintings in seconds. Choose from various styles like Van Gogh or watercolor.
- Manual Tracing: Print a grid overlay, transfer it to a canvas, and paint using acrylics. A more involved but rewarding DIY approach.
- Digital Painting Software: Programs like Krita or GIMP let you paint over a photo reference, offering full control over the final look.
Each method varies in time, cost, and output type, making it easy to find one that fits your needs. Whether you're crafting a gift, decorating your space, or trying a new hobby, these methods bring your photos to life in a whole new way.
How to Turn a Photo into a Painting in Photoshop (Using the Filter Gallery)

sbb-itb-68cf19f
Method 1: Order a Custom Paint-by-Numbers Kit from Paint by Numbers Online
Transforming your favorite photo into a paint-by-numbers masterpiece is easier than you might think. With Paint by Numbers Online, you can upload a photo, customize your kit, and receive everything you need to create a personalized artwork. It’s a simple and relaxing way to bring your memories to life.
Here’s how you can get started:
Step 1: Upload Your Photo
Head to the Custom Paint by Numbers product page and click Upload to submit your photo. Choose a high-resolution image (at least 500–1,000 pixels on the longest side) to avoid pixelation and ensure a crisp result. The quality of your photo plays a huge role in the final painting. As Paint by Numbers Online explains:
"The secret to a stunning final painting often lies in the photo you start with. I've seen it time and again: a great photo almost always leads to a great painting." - Paint by Numbers Online
To get the best results, crop your photo so the main subject fills at least 70% of the frame. Also, match the photo’s aspect ratio to your canvas size. For example, a 4:3 ratio works perfectly for a 30×40 cm canvas, while a square crop suits Instagram-style portraits. Double-check your image’s pixel dimensions before uploading.
Step 2: Choose Your Kit Options
After uploading your photo, select the canvas size and paint palette complexity that suits you. Smaller canvases, like 12×16 inches, are great for beginners, while larger sizes, such as 24×36 inches, allow for more intricate details.
For the paint palette, you have options too. A 24-color palette gives a bold, stylized look, while 36 to 48 colors help achieve smooth gradients and realistic shadows. Pricing starts at $42.00 USD for custom kits, with options for pet and couple portraits starting at $38.00.
Step 3: Receive Your Kit and Start Painting
Your kit will arrive with everything you need: a numbered linen canvas, matching acrylic paints, and three brushes. Set up a well-lit workspace with two cups of water - one for rinsing brushes and one for thinning the paint. To avoid smudging, paint from the top of the canvas down and begin with the lightest colors first.
On average, completing a custom project takes 8 to 20 hours, but the process is incredibly rewarding. With a 4.7/5 star rating from 177 reviews, many users praise the experience as both relaxing and satisfying.
Method 2: Use Digital Filters in Photoshop
Turn your photo into a painting with Photoshop's built-in artistic filters. These filters can replicate brushstrokes, oil textures, and hand-painted effects, making them ideal for landscapes or still life shots.
Start by converting your image layer into a Smart Object. To do this, right-click the layer and select "Convert to Smart Object." This step ensures your original photo stays intact and allows you to edit filters without permanently altering the image. As Adobe puts it:
"Converting to a Smart Object allows you to go back and edit the artistic filter that you will apply... This is called a 'nondestructive edit' because it preserves the original photo."
Once your layer is ready, dive into the filters to create distinct painting effects:
- For a hand-painted style, go to Filter > Filter Gallery > Artistic > Dry Brush. Set Brush Size to 7, Brush Detail to 9, and Texture to 1.
- For an oil painting effect, use Filter > Stylize > Oil Paint. Adjust Stylization to 10, Cleanliness to 7–8, Scale to 0.1, Bristle Detail to 10, and Shine to 0.5. Keep in mind, the Oil Paint filter requires a compatible GPU, and it may appear grayed out if OpenCL isn’t enabled in your performance settings.
To enhance the painting effect, increase color saturation. Add a Hue/Saturation adjustment layer and boost the saturation by +60 to +70. This step helps bring out vibrant, painterly tones.
For a more layered look, combine multiple filters. In the Filter Gallery, click the "New effect layer" icon. For instance, you can layer Paint Daubs with Angled Strokes to add intricate details over broader textures.
If the applied effect is too intense in certain areas - like a face - use a Layer Mask on the Smart Filter. Paint over the mask with black to tone down the effect selectively, preserving finer details exactly where you want them.
Method 3: Apply AI Photo-to-Painting Converters Online
If you're looking for a quick and hassle-free way to turn your photos into art, AI-powered online converters are a fantastic option. These tools use advanced algorithms to analyze your photo's key elements - like facial features, textures, and depth - so the chosen artistic style fits seamlessly without losing important details. Platforms like Fotor, which boasts over 800 million users globally, have made this process widely accessible.
Step 1: Upload and Choose a Style
Start by uploading your photo to the online tool. Most platforms let you upload via a button or drag-and-drop feature. For the best results, pick a high-resolution image with good lighting. A well-cropped, sharp photo ensures the AI can work its magic effectively.
After uploading, explore the available painting styles. Many tools feature a variety of filters - often more than 50 options - ranging from Oil Painting (rich textures) to Watercolor (soft and fluid) and Sketch (charcoal or pencil). Some even replicate the iconic styles of artists like Van Gogh or Monet, bringing their signature techniques to your photo. Choose a style that highlights your subject - Oil Painting works beautifully for portraits, while Watercolor is ideal for scenic landscapes.
Once you've picked your style, you can move on to fine-tuning the effect.
Step 2: Refine and Download
After selecting a style, use the tool’s adjustment options to tweak the effect. You can typically control settings like Amount (the overall intensity of the effect), Fidelity (how well details are preserved), and Smoothness (the texture of brushstrokes). If the filter overemphasizes certain features, like facial details, you can tone it down for a more natural look.
Most platforms include a preview feature, allowing you to compare your original photo with the transformed artwork. Once you’re happy with the results, download your masterpiece in high-quality JPG or PNG format. If you're planning to print your artwork on a large canvas, look for tools that support resolutions up to 64 MP.
Method 4: Manual Tracing and Paint-by-Numbers Recreation
This method lets you take a hands-on approach to transform your photo into a painting, embracing the charm of paint-by-numbers art. Though it takes more time compared to digital methods, the process immerses you in the same techniques that helped paint-by-numbers become a sensation. By 1954, an estimated 12 million kits had been sold worldwide.
Step 1: Print a Numbered Grid Overlay
Start by dividing your photo into sections using a grid. You can use GriDraw to upload your image, set the number of rows and columns, and enable labeling before downloading and printing the gridded photo. Alternatively, you can insert the photo into Microsoft Excel, adjust cell sizes to create squares, and enable "Print Gridlines." Be sure to tweak gridline color and thickness for better visibility, especially on darker images.
Once your gridded photo is printed, you're ready to transfer the outline onto your canvas.
Step 2: Transfer to Canvas
Place carbon transfer paper (graphite-side down) on your canvas, then tape your printed grid on top. Use a ballpoint pen or hard pencil to trace the lines, pressing firmly so the graphite transfers clearly onto the canvas.
"I find a 2H pencil works perfectly because it's light enough not to show through the paint. This technique is incredibly precise and means zero risk of smudging." - Custom Paint By Numbers
Alternatively, you can project the image onto the canvas and trace it using a 2H pencil, which minimizes smudging, especially on larger surfaces. After tracing, erase any stray marks or smudges before painting begins.
With the design in place, you're ready to focus on color and bring the image to life.
Step 3: Match Colors and Paint
Apply a "posterize" filter to your photo to simplify it into distinct color blocks - 24 to 36 colors strike a good balance between detail and manageability. Take a screenshot of the resulting palette to guide your paint selection. Acrylic paints work best for this project because they are opaque, dry quickly, and clean up easily with water. Mix the paints until they have a smooth, creamy consistency for even application.
Start painting from the top of the canvas and work your way down, beginning with the darkest colors to define the structure. If pencil marks are visible through lighter shades, let the paint dry completely and apply a second thin coat.
This method not only results in a stunning piece of art but also allows you to experience the satisfaction of creating something truly personal.
Method 5: Digital Painting Over Photo Reference in Free Software
Transform your photos into digital paintings using free tools like Krita and GIMP. These open-source programs provide professional-grade features, giving you the tools to create art that’s uniquely yours. Instead of relying on filters, this method lets you paint every stroke, allowing for complete control over detail and stylization. It’s the perfect blend of creativity and accessible technology.
Step 1: Set Up Layers
Start by opening your photo in Krita or GIMP, then create a new transparent layer for your painting. Here’s how:
- In GIMP: Open the Layers panel with Ctrl + L, then add a new transparent layer using Ctrl + Shift + N.
- In Krita: Drag your photo into the workspace and choose "Insert as Paint Layer" to make it editable, or "Insert as Reference Image" if you prefer a non-printing guide.
To make painting easier, reduce the opacity of your reference layer to around 50–80%. This lets you see your brushstrokes while keeping the original image visible. Use the visibility toggle to compare your work with the base photo. Always paint on the transparent layer to keep the original image intact.
Step 2: Use Digital Brushes
Once your layers are ready, it’s time to choose and apply digital brushes for your painting.
- Krita: The program offers a wide variety of brush presets that mimic traditional materials like oil, acrylic, watercolor, and charcoal. Press F5 to open the brush editor, where you can customize size, spacing, and pressure sensitivity. For initial layouts, try brushes from the "Block Tag" category, such as "Block fuzzy" or "layout_block."
- GIMP: Use the airbrush tool (A) for soft shadows and highlights. Larger brushes can help create textured, natural edges.
"Krita specializes in materials emulation, allowing the artist to adjust and fine-tune their tools through a brush engine so that they can achieve exactly the look and drawing feel they need." - Seth Kenlon
To maintain color harmony, use the color-picker (eyedropper) tool to sample shades directly from your reference photo. In GIMP, hold Ctrl while in airbrush mode to toggle the tool quickly. Build depth by layering low-opacity strokes (10–30%) and experimenting with blending modes like Multiply for shadows, Screen for highlights, or Overlay to unify colors. Resize brushes easily with the [ and ] keys, and press / to switch between your current and previous brushes.
This method gives you the freedom to explore your artistic style while using powerful tools to bring your vision to life.
Comparison of Methods
Comparison of 5 Methods to Turn Photos into Paintings
Let’s break down the methods side by side to help you figure out which one aligns with your goals, budget, and time availability.
If your end goal is a physical painting to display, custom paint-by-numbers kits or manual DIY recreation are excellent choices. On the other hand, if you’re looking for fast and easy digital results, AI converters or Photoshop filters can deliver in no time. For those who prefer complete creative control, digital painting software offers plenty of flexibility.
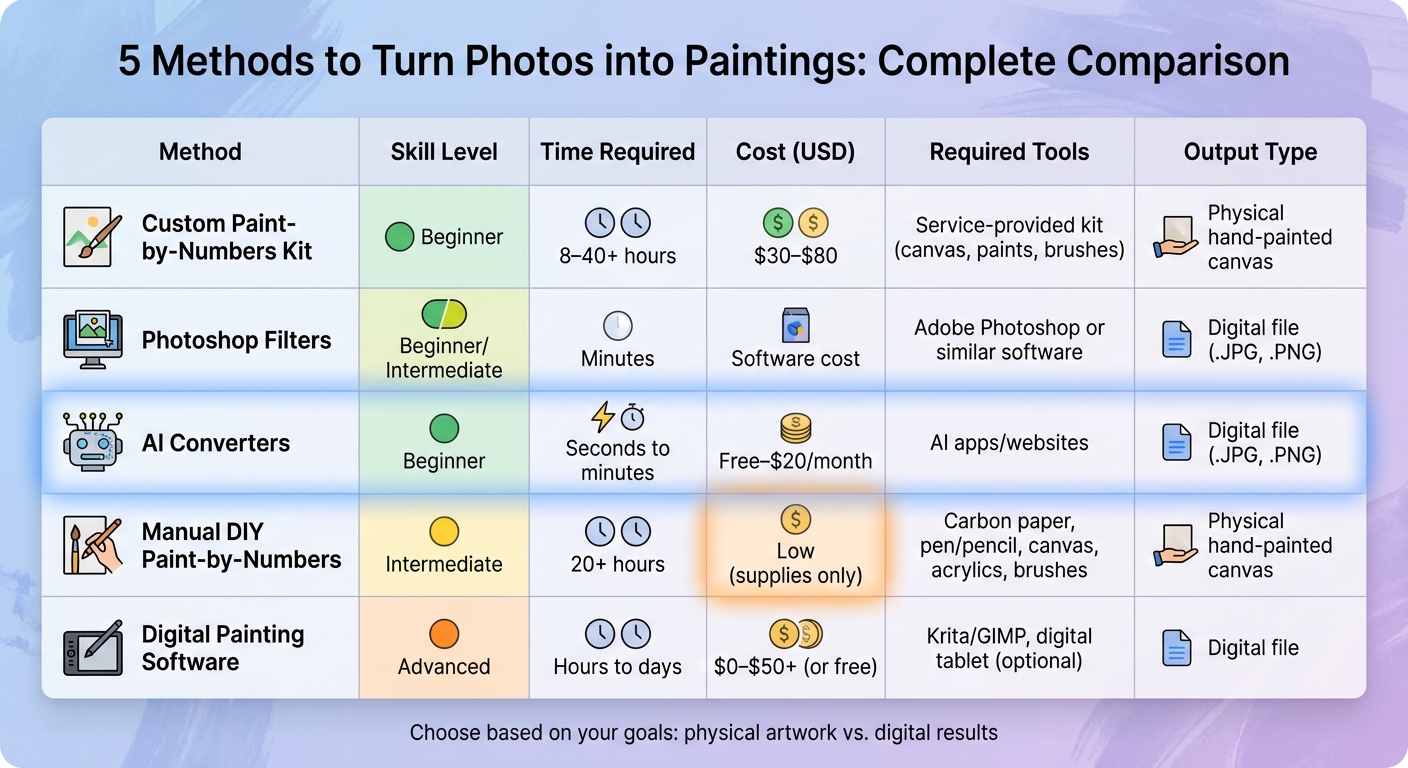
Time and cost are key factors to consider. AI converters are the fastest, producing results in seconds, with Photoshop filters following close behind at just a few minutes. Custom kits and manual painting take considerably longer - anywhere from 8 to 40+ hours for kits and at least 20 hours for manual efforts. Digital painting software falls somewhere in between, requiring hours or even days depending on the complexity of the project.
Budget-wise, manual DIY methods are the most affordable, requiring only basic supplies like acrylic paints, brushes, and carbon transfer paper. Custom paint-by-numbers kits typically cost between $30 and $80 . AI converters often include free versions, though premium subscriptions are around $20 per month . Digital painting software ranges from $10 to $50+, but free options like Krita and GIMP offer professional-grade features at no cost.
Here’s a quick comparison to summarize the key aspects of each method:
Comparison Table
| Method | Skill Level | Time Required | Cost (USD) | Required Tools | Output Type |
|---|---|---|---|---|---|
| Custom Paint-by-Numbers Kit | Beginner | 8–40+ hours | $30–$80 | Service-provided kit (canvas, paints, brushes) | Physical hand-painted canvas |
| Photoshop Filters | Beginner/Intermediate | Minutes | Software cost | Adobe Photoshop or similar software | Digital file (.JPG, .PNG) |
| AI Converters | Beginner | Seconds to minutes | Free–$20/month | AI apps/websites | Digital file (.JPG, .PNG) |
| Manual DIY Paint-by-Numbers | Intermediate | 20+ hours | Low (supplies only) | Carbon paper, pen/pencil, canvas, acrylics, brushes | Physical hand-painted canvas |
| Digital Painting Software | Advanced | Hours to days | $0–$50+ (or free) | Krita/GIMP, digital tablet (optional) | Digital file |
For beginners, AI converters are an easy way to get instant digital results, while custom paint-by-numbers kits allow for a fun, hands-on experience without needing artistic skills. It’s worth noting that AI art generators are exploding in popularity, with over 34 million images created daily. This reflects just how appealing quick digital transformation has become.
Conclusion
Turning photos into paintings has never been easier. Whether you want a quick digital transformation for social media or a hands-on project that results in a physical masterpiece, there’s an option for everyone. AI tools and Photoshop filters offer instant results, while custom paint-by-numbers kits and traditional methods provide a more immersive, offline experience. No matter your artistic background, there’s a method to match your creative ambitions.
What you choose depends on your priorities. If speed and ease are key, AI tools deliver stunning results in seconds. But if you’re after a calming, hands-on activity, paint-by-numbers kits strike a great balance between structure and creativity. In fact, the global paint-by-numbers market is estimated to be worth $1.56 billion by 2024, highlighting its growing appeal. These kits don’t just result in beautiful artwork - they also provide a meditative way to unwind and focus, one brushstroke at a time.
The benefits go beyond the finished product. These approaches encourage stepping away from screens and embracing a slower, more thoughtful creative process. Whether you’re capturing a cherished memory, celebrating a loved one, or simply exploring a new hobby, you’re creating something deeply personal that reflects the emotions tied to your favorite moments.
When starting out, beginners might find it helpful to choose a manageable palette of 24 to 36 colors. With the right image and a clear vision, you’re not just making art - you’re preserving memories in a way that’s both meaningful and timeless.
FAQs
What’s the best method for a physical painting?
Creating a physical painting can be both fun and rewarding, and one of the best ways to dive in is with a custom paint-by-numbers kit. This method allows you to turn a favorite photo into a canvas masterpiece. The kit comes with numbered sections on the canvas and matching paints, making it simple to follow along. It’s an ideal choice for beginners and provides a relaxing and enjoyable way to explore your creative side.
How do I choose the right photo to upload?
When selecting a photo, opt for one where the subject takes up most of the frame. This helps maintain focus and ensures clarity in the final painting. Use a high-resolution image - at least 500 pixels - to capture fine details. Photos with strong color contrast and clear shading work best, as they simplify the painting process and lead to a more striking and detailed piece of artwork.
Will my finished result look like the photo?
Your final result might not be an exact match to the photo, but it will reflect its overall style depending on the method you choose. Digital AI filters offer an artistic take, creating interpretations of the image, while paint-by-numbers kits provide a more structured, stylized version with clear outlines to follow. The finished piece will vary based on the quality of the conversion process and your own painting abilities, but it will typically convey the essence of your photo in a creative, painted form.
)