

How to Avoid Streaks in Paint-by-Numbers
- by Paint by number online
-

Streaks in paint-by-numbers projects can ruin the smooth finish you're aiming for. Here's how to avoid them:
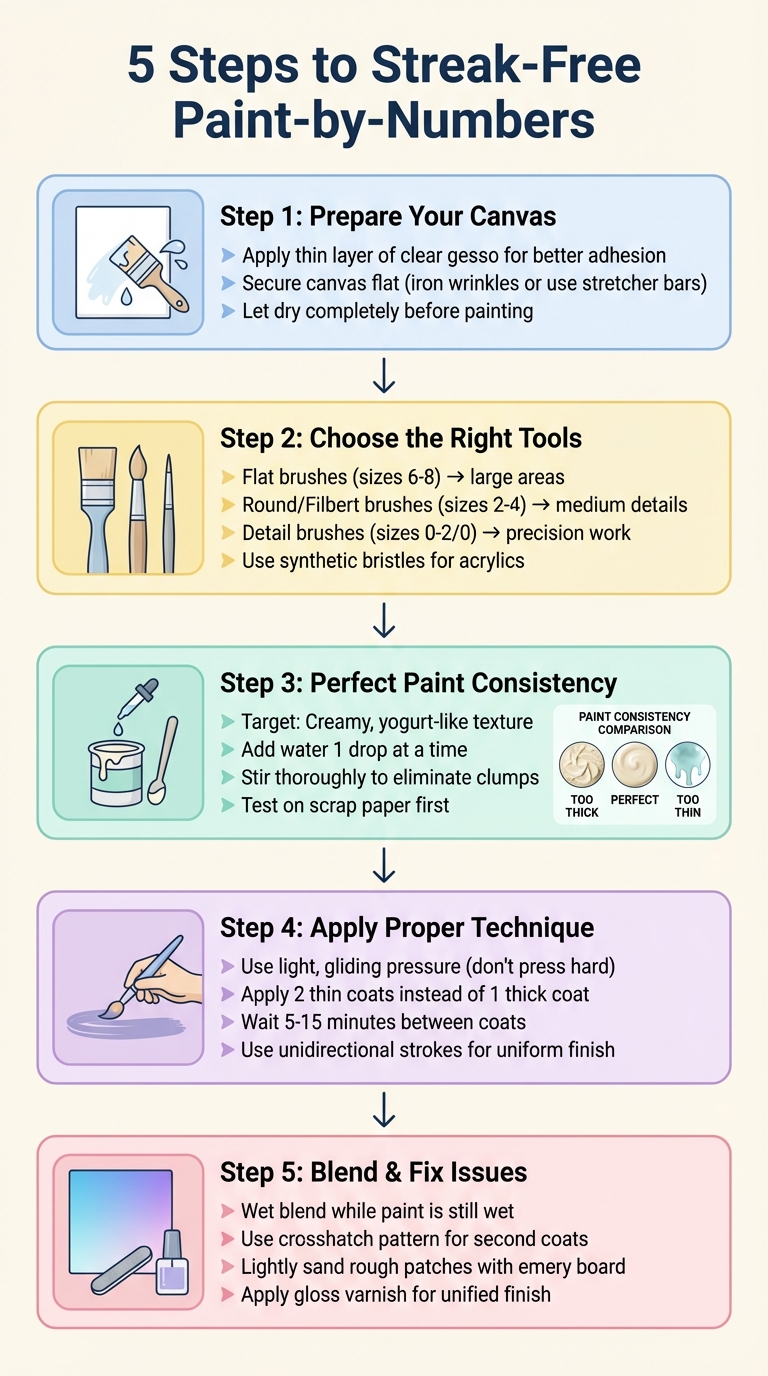
- Prepare your canvas: Apply a thin layer of clear or white gesso for better paint adhesion and a smoother surface.
- Use the right tools: Choose flat brushes for large areas, round or filbert brushes for medium details, and detail brushes for precision. Synthetic bristles work best with acrylic paints.
- Master paint consistency: Keep paint at a creamy, yogurt-like texture. Add water drop by drop to thin thick paint, but avoid over-dilution.
- Refine your technique: Apply thin, even layers, control brush pressure, and avoid overworking semi-dry paint to prevent streaks.
- Blend and fix: Use wet blending or dry brushing for smooth gradients. For streaky areas, apply a second thin coat or lightly sand and repaint.
Patience and proper preparation are key to achieving a polished, streak-free result.
5-Step Guide to Achieving Streak-Free Paint-by-Numbers Results
5 Tips for Fixing Streaky Paints for Paint by Numbers PBN | Transparent Translucent Tutorial | Mel B
sbb-itb-68cf19f
Preparing Your Canvas for Even Paint Application
Getting your canvas ready is a crucial step for smooth, streak-free painting. Skipping this part is like painting on wrinkled paper - it highlights every flaw and makes achieving a clean finish almost impossible.
Applying Primer or Gesso
Gesso is a must-have for creating a surface that holds paint better. As Opalberry explains:
Gesso is a paint mixture that gives your canvas more 'tooth'... giving it better paint adhesion.
For paint-by-numbers projects, clear gesso is ideal. It adds texture without hiding the printed numbers underneath. Use a soft-bristled brush to apply a thin, even layer in one direction. Jane Hawkings, a painting expert, emphasizes this:
A smooth base will set you up for a flawless finish. Let it dry completely, then touch it up with a second coat if you're after that extra sleek surface.
If the printed numbers are dark or you're working with very light colors, consider white gesso for better coverage. Just keep in mind that white gesso may obscure the numbers, so having a photo reference handy can save you from guesswork. For extra precision, a white acrylic marker can be used to pre-cover numbers that might show through lighter paints.
Securing the Canvas
Wrinkles and creases are your worst enemy when painting. William Murdock offers this advice:
Never paint on a wrinkled canvas. Once the paint dries, the crease is permanent.
To fix creases, gently iron the back of the canvas on a low heat setting or flatten it under heavy books. Once it's smooth, secure it by taping the edges to a flat surface using low-tack masking tape or mounting it on wooden stretcher bars. For larger canvases (over 16x20 inches), a tabletop easel can help keep everything stable and wrinkle-free as you work.
With a properly primed and secured canvas, you'll have the perfect foundation to achieve an even, polished paint application.
Choosing the Right Brushes and Paints
Once your canvas is ready, the next step is picking the right tools to achieve a smooth, streak-free finish.
The right brushes make all the difference. For large areas like skies or backgrounds, flat brushes are your go-to - they help spread paint evenly and minimize streaking. When working on medium-sized sections, consider round brushes or filbert brushes. Round brushes are versatile, offering a fine tip for clean lines and a broader head for filling spaces. Filbert brushes, with their flat, oval shape, allow for both broad strokes and finer detailing, making them a great all-around choice.
For the smallest details, such as facial features or intricate patterns, a detail brush is essential. Brushes sized 0–2/0 are ideal for precision work, while sizes 2–4 handle medium areas, and sizes 6–8 are better for covering larger sections.
When it comes to bristles, synthetic options like nylon or taklon are perfect for acrylic paints. They’re stiffer and less absorbent than natural bristles, which prevents them from soaking up too much paint or water. This ensures crisp edges and smooth application, allowing you to control your strokes more effectively.
Using Quality Acrylic Paints
Your choice of paint is just as crucial as your choice of brushes. High-quality acrylic paints are packed with pigment, offering rich colors and excellent opacity. This means even lighter shades can fully cover the numbers and lines on your canvas with just one or two thin coats, saving you from layering endlessly.
Paint by Numbers Online kits come with premium acrylic paints specifically formulated for smooth, even coverage. If the paint starts to thicken after being exposed to air, simply add 1–2 drops of warm water and stir to bring it back to the right consistency.
Steer clear of low-quality paints, as they often lead to streaky results. Paint that’s too thick can drag and leave marks, while overly thin paint won’t adequately cover the numbers underneath. The ideal paint strikes a balance between thickness and fluidity, ensuring a smooth and even finish every time.
Painting Techniques to Prevent Streaks
Once you've got high-quality brushes and paint, the next step is all about refining your technique to keep those pesky streaks at bay.
Controlling Brush Pressure
The key here is to glide the brush rather than pressing down hard. Too much pressure can leave drag marks behind. If you find yourself needing to push the brush, your paint might be too thick. Try thinning it with a small amount of water until it reaches a yogurt-like consistency. This adjustment helps your brush move more smoothly while still giving you control.
Another tip: don’t overload your brush with paint. A small amount is easier to manage and prevents excess paint from pooling in tight corners or numbered sections. And when switching colors, rinse and dry your brush thoroughly to avoid creating watery streaks.
Applying Thin, Even Layers
Always aim for two thin coats instead of one thick one. A heavy layer of paint can clump, drag, and leave visible marks, while thin layers dry more evenly and offer better coverage. After applying a thin coat, wait about 5–15 minutes for it to dry before adding another layer if needed. Resist the urge to overwork wet paint, as this can ruin the smooth finish.
For those tiny, hard-to-reach spots where even your smallest brush feels too big, a toothpick can be a lifesaver for precise dotting.
Using Consistent Brush Strokes
Consistency is your best friend here. Stick to unidirectional strokes for a uniform look. For larger areas like skies or backgrounds, long, slightly overlapping strokes in a single direction - usually downward - tend to work best. Maintain gentle, steady pressure throughout each stroke to avoid deep brush marks.
If you notice streaks once the paint dries, don’t panic. A thin second coat applied with a crosshatch motion (strokes in opposite directions) can help even out the texture.
Getting the Right Paint Consistency
Mastering the right paint consistency is just as important as perfecting your brush technique. If your paint is too thick, it will drag across the surface and leave unwanted marks. On the other hand, overly thin paint can look transparent and require multiple layers to achieve full coverage. The sweet spot? A creamy, yogurt-like texture that spreads easily while maintaining good opacity.
Thinning Paint with Water
When your paint feels lumpy or too thick, start by adding water - just one drop at a time. Using a dropper is ideal, and distilled water works best for consistency. After each drop, stir thoroughly with a toothpick or small brush, making sure to scrape the sides and bottom of the pot to eliminate clumps. Test the adjusted paint on a piece of scrap paper to ensure it’s just right before applying it to your project. If you accidentally thin it too much, don’t worry. You can still work with it by applying several thin layers to gradually build up the color.
For even better control, consider using a flow aid. Mix it at a 1:20 ratio with water in your water cup. Unlike plain water, flow aid helps the paint spread more smoothly while maintaining its opacity. Just be cautious - never pour water directly into the main paint pot. Over-dilution can ruin the entire batch, leaving you with unusable paint.
Once you’ve achieved that creamy texture, make sure every color is mixed evenly before you start painting.
Mixing Paint Colors Thoroughly
Even paint that looks pre-mixed can have settled pigment hiding at the bottom. To avoid streaky or uneven coverage, give each color a thorough stir before use, reaching into every corner of the container to break up hidden clumps.
Lighter shades, like pale yellows or blues, often contain less pigment and are more prone to streaking. If a color seems too sheer, adding a small amount of white paint can improve its opacity without drastically changing the hue. As always, test your mixed colors on scrap paper first to make sure the consistency and shade are exactly what you need.
Blending and Fixing Problem Areas
Even with careful application, hard lines or uneven areas can appear once the paint dries. The good news? These imperfections are easy to tackle with the right techniques. Here's how to blend colors seamlessly and fix problem spots.
Blending Colors for Smooth Transitions
To achieve smooth gradients, timing is everything - work while the paint is still wet. Use a damp brush to gently blend lighter and darker shades together, focusing on one small section at a time. Acrylic paint dries quickly, so keeping your area manageable ensures the colors stay workable.
For a softer, misty effect, try dry brushing. Once your base coat is dry, dip a dry brush into a small amount of paint, wipe off the excess on a paper towel, and use light circular motions to feather the edges. This technique creates a hazy, blended look. Alternatively, while the paint is still wet, use a zig-zag motion where two colors meet to blur harsh lines. Wiping your brush frequently helps maintain clean transitions and prevents colors from mixing into an unwanted shade.
If streaks or lines persist despite blending, don't worry - there are ways to fix them.
Fixing Streaky or Uneven Sections
Sometimes, even with careful blending, streaks or uneven areas might still show up. If this happens, wait for the paint to dry and apply a second thin coat using a crosshatch pattern. This helps even out the texture and smooth over any inconsistencies.
For more stubborn issues, like dried lumps or rough patches, lightly sand the area with an emery board, clean off the dust, and apply a fresh coat of paint. If underlying numbers or marks peek through lighter colors, cover them with a small dot of white paint, let it dry, and then paint over it. Once your painting is complete, a layer of gloss gel varnish can help unify the finish and mask any remaining imperfections.
With these techniques, you can ensure your painting looks polished and cohesive, even if a few hiccups arise along the way.
Conclusion
To achieve a smooth, streak-free finish in your painting, start by priming your canvas and thinning your acrylics to a yogurt-like consistency. Apply two thin coats instead of one thick layer, and make sure your brushes stay clean throughout the process. These steps, combined with a bit of patience, can help you create a polished, professional-looking result.
"Patience is cheaper than a new canvas." - paintbynumbers.eu
Using high-quality materials also makes a big difference. Premium kits come with opaque, richly pigmented paints and wrinkle-free, pre-printed canvases, which often require fewer layers to achieve the desired effect.
FAQs
Should I use clear or white gesso?
Clear gesso is a great choice for paint-by-numbers projects. It creates a surface that helps paint stick better and improves coverage, all while keeping the lines and numbers visible. On the other hand, white gesso can hide those details, making it harder to follow the design. By using clear gesso, you can prepare your canvas effectively without losing the visibility needed for precise painting.
How do I stop paint from drying too fast?
To stop your paint from drying out too fast during a paint-by-numbers project, try covering your palette or paint pots with plastic wrap or a damp cloth whenever you're not using them. Another trick is to mix in a few drops of water or a flow aid to help the paint spread more easily. Focus on smaller sections at a time, and avoid loading too much paint onto your brush. This helps keep the paint moist and ensures a smoother, more even application.
What if I already painted streaky areas?
If you've ended up with streaky areas in your painting, don't worry - it can be fixed. First, let the paint dry completely. Once dry, you have two options: carefully scrape off the streaky paint using a craft knife or cover the area with a layer of white paint before reapplying the correct color.
To prevent streaks in the future, make sure your paint has the right consistency and apply it with steady, even pressure on the brush. This simple adjustment can make a big difference in achieving a smooth, flawless finish.