

How to Turn Photos into Paint by Numbers Art
- by Paint by number online
-

Transforming your photos into paint-by-numbers art is simple and enjoyable. This process converts your favorite images - family portraits, pets, or landscapes - into pre-numbered canvases you can paint yourself. Here's how it works:
- Upload a photo: Choose a clear, high-resolution image with good lighting and contrast. Stick to simple backgrounds and 1–4 subjects to ensure easy painting.
- Customize your kit: Select canvas size and color depth (24, 36, or 48 colors) based on your skill level and desired detail.
- Receive your kit: It includes a pre-printed canvas, matching acrylic paints, and brushes for different tasks.
- Start painting: Follow the numbers, one color at a time, to create your artwork. Use tips like working top-to-bottom and applying multiple coats for a polished finish.
This activity is great for relaxation and turning cherished memories into art. Kits typically cost $30–$50 and can take 8–25 hours to complete, depending on complexity.
HOW TO MAKE YOUR OWN CUSTOM PAINT BY NUMBERS PBN with This FREE & Easy Tool | PBNIFY for DIY PBNs
sbb-itb-68cf19f
Selecting the Best Photo for Your Kit
When choosing a photo for your custom paint-by-numbers kit, focus on clarity and composition. A sharp image with a clear main subject is essential - blurry or overly cluttered photos can result in sections that are difficult to paint. The key details in your photo must be large enough to translate into paintable sections once the software processes it. For group photos, stick to 1–4 subjects to ensure their features remain recognizable.
"Your custom paint by number can only come out as good as the image you put in. As our MPBN accountants say, 'Garbage in, Garbage Out.'"
Additionally, your photo must meet specific quality standards to ensure the best results.
Photo Quality Requirements
Your image should have a resolution of at least 750px to 1,000px on its longest side. For a standard 16"x20" (40x50cm) canvas, a resolution of around 1,500x2,000 pixels is recommended to maintain quality. To check if your photo is sharp enough, zoom in on your device - if the image appears pixelated or blurry, it may not convert well into a painting.
Lighting and contrast play a crucial role. Aim for natural, even lighting to avoid harsh shadows or overly bright areas that can confuse the software. Strong contrast between the subject and background helps define numbered sections more clearly, ensuring the final painting doesn’t look dull or washed out.
A simple background is also important. Busy or overly detailed backgrounds can create too many small, intricate sections that are tedious to paint. For landscapes, choose a photo with a clear focal point, like a single tree or mountain, instead of a scene with too many competing elements.
| Photo Characteristic | Ideal | Avoid |
|---|---|---|
| Subject | Single, clear subject | Multiple overlapping subjects |
| Background | Simple, solid, or blurred | Busy, cluttered, or detailed |
| Contrast | High contrast | Low contrast or blending colors |
| Lighting | Natural, even light | Harsh shadows or washed-out spots |
Once your photo meets these standards, a few simple edits can further refine it for conversion. Following these tips ensures that your image is clear and vibrant, making it easier for Paint by Numbers Online to transform it into a high-quality painting kit.
Editing Your Photo Before Upload
Making quick adjustments to your photo before uploading can significantly improve the final result. Crop your photo to eliminate distractions like unnecessary background elements or stray objects. Your main subject - whether it’s a person, pet, or part of a landscape - should fill at least 70% of the frame.
Use built-in tools to adjust brightness and contrast to enhance colors and sharpen edges. The idea isn’t to make the photo flawless but to create a clearer reference for the software to work with.
"The goal isn't to make the photo flawless, but to create a better reference for your painting. You're just highlighting the key features you want the final artwork to capture."
Lastly, match your photo’s aspect ratio to your chosen canvas size to avoid awkward cropping or blank spaces. For example, a 4:3 ratio works well for a 30x40cm canvas, while square photos are ideal for 40x40cm canvases. Most smartphones capture images in 4:3 or 3:2 ratios, which align well with standard kit sizes. Avoid applying color filters or heavy edits, as these can interfere with the software’s ability to interpret realistic paint colors.
Uploading and Customizing Your Photo on Paint by Numbers Online
Paint by Numbers Kit Color Options Comparison Guide
Once your photo is polished and ready, it's time to upload it to Paint by Numbers Online and turn it into a custom kit. The platform accepts 98% of photo submissions, so chances are, your chosen image can be transformed into a personalized masterpiece.
How to Upload Your Photo
Head over to the custom photo page on Paint by Numbers Online and click the "Upload Your Photo" button. You can easily upload images from your phone or computer. Supported formats include JPEG, PNG, and HEIC.
After uploading, you'll likely see a real-time preview tool that shows how your photo will look in a paint-by-numbers format. Within about two working days, their team will review your image to ensure it meets production standards. If your photo doesn’t meet the guidelines, you’ll receive an email asking for a replacement. Once approved, you can move on to customizing your kit.
Choosing Your Kit Options
Following the photo preview and approval, you can personalize your kit to suit your style and skill level. One of the key choices is the canvas size. For standard iPhone photos with a 4:3 ratio, a 12"x16" (30x40 cm) canvas is a great fit. If you’re working with square Instagram-style photos, a 16"x16" (40x40 cm) canvas is ideal.
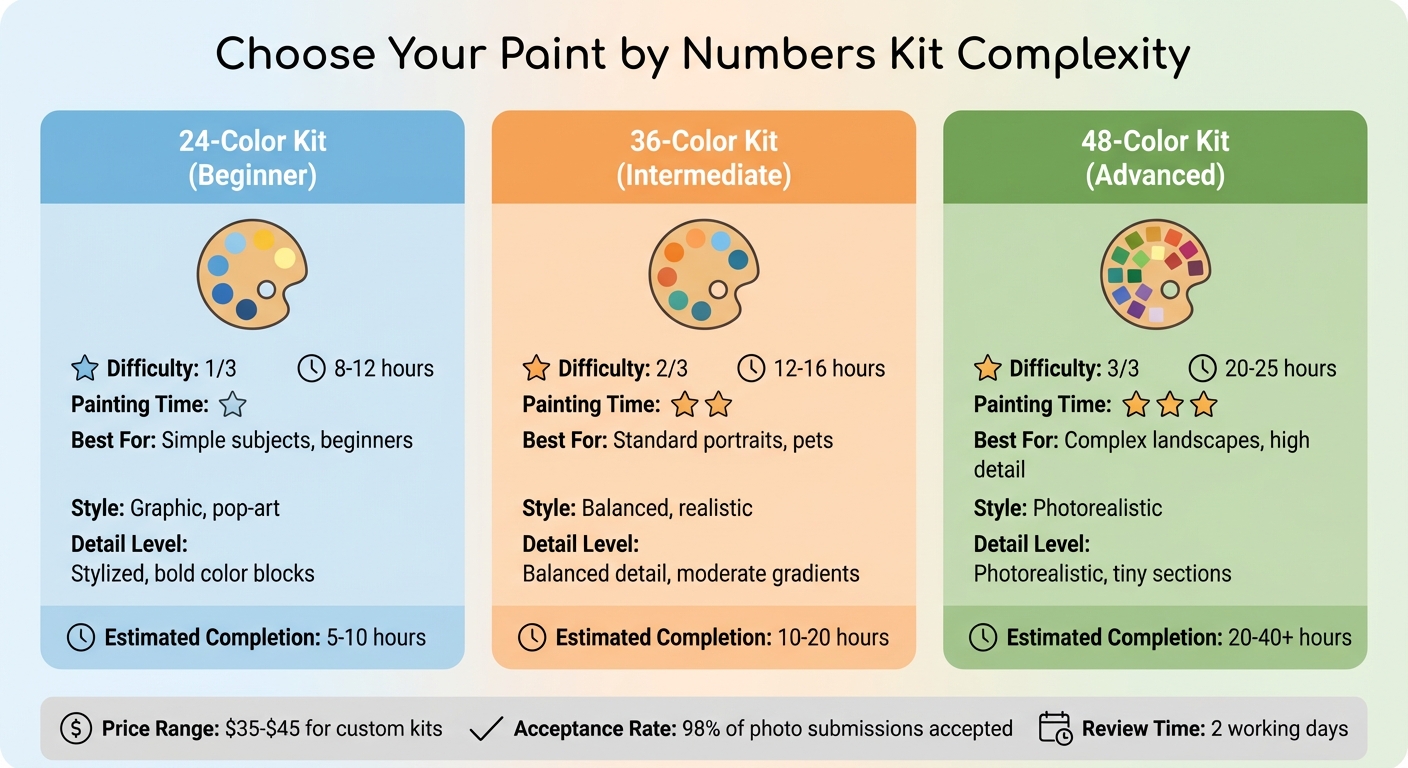
Another important decision is the color palette depth. Options range from simple to highly detailed, depending on your preferences:
- 24-color kits: Great for beginners or bold, graphic designs. These take about 8–12 hours to complete.
- 36-color kits: Perfect for portraits or pet photos, offering a balance between realism and simplicity. Expect 12–16 hours of painting time.
- 48-color kits: Ideal for detailed landscapes or photorealistic images, with smooth gradients. These require 20–25 hours of work.
Custom kits are priced between $35 and $45.
| Color Count | Best For | Painting Time | Style |
|---|---|---|---|
| 24 Colors | Simple subjects, beginners | 8–12 hours | Graphic, pop-art |
| 36 Colors | Standard portraits, pets | 12–16 hours | Balanced, realistic |
| 48 Colors | Complex landscapes, high detail | 20–25 hours | Photorealistic |
What's Included in Your Custom Kit
Kit Components
When your custom kit arrives, it’s packed with everything you need to turn your photo into a painting. The kit comes with a pre-printed linen or cotton canvas, complete with a numbered layout to guide your brushstrokes.
The acrylic paints are a highlight of the kit. Paint by Numbers Online uses software to create custom-mixed, non-toxic paints that match the colors in your photo perfectly. Each color comes in its own numbered pot, making the process straightforward.
You’ll also find three brushes tailored to different tasks: a detail brush for fine work, a medium brush for general sections, and a flat brush for larger areas like backgrounds. Most kits also include a printed reference sheet - a smaller version of your photo with the numbered grid overlay. Depending on the level of detail you select, the kit's components are designed to suit various skill levels.
Skill Level Differences
The kit adjusts in complexity based on the number of colors you choose, which corresponds to your preferred level of detail.
| Skill Level | Detail Level | Number of Colors | Estimated Completion Time |
|---|---|---|---|
| Beginner | Stylized, bold color blocks | 24 colors | 5–10 hours |
| Intermediate | Balanced detail, moderate gradients | 36 colors | 10–20 hours |
| Advanced | Photorealistic, tiny sections | 48 colors | 20–40+ hours |
One customer, Amanda B., shared that the numbered areas in the kit can be quite intricate, especially in the advanced sets. She even recommended using a magnifying glass for the smallest sections. If you’re working on a highly detailed kit, adding a magnifying glass to your tools might make the process smoother and more enjoyable.
Painting Your Custom Photo Canvas
Painting Techniques and Order
The way you approach your painting makes a big difference in how it turns out. Start at the top of the canvas and work your way down. This simple trick helps you avoid smearing wet paint as you move along. If you're right-handed, it's also a good idea to paint from left to right to reduce accidental smudges.
Stick to one color at a time instead of jumping between different numbered sections. Completing all areas of a single number before moving on keeps your workflow smooth and prevents paint pots from drying out due to constant opening and closing.
For larger areas, use a broad brush, and switch to a fine-tipped brush for detailed sections. When tackling intricate spots, steady your painting hand with your other hand for better control.
"Don't obsess over getting it perfect on the first try. Think of your first coat as a base layer - you're just getting the colors blocked in." - Custom Paint By Numbers
If the numbers show through after the first coat, simply go over them with a second layer for better coverage. For a smoother, more blended look, use a clean, dry brush to softly feather the edges between two wet colors. This creates a gradient effect instead of sharp lines.
Once you've got your painting plan in place, setting up an organized workspace will help you stay on track.
Maintaining Your Project and Workspace
Choose a flat, well-lit surface for your workspace - natural light is ideal for seeing those tiny numbers clearly. Protect your table with an old tablecloth or newspaper. Arrange all your supplies - canvas, paint pots (in numerical order), brushes, water cup, and paper towels - so they’re easy to reach.
Take care of your brushes by rinsing them immediately after finishing with each color. Gently blot them on a paper towel to remove excess water and reshape the bristles into a point. Avoid pressing the bristles down or leaving brushes soaking in water, as this can permanently damage them.
Keep your paint fresh by snapping the lids shut tightly after every use. If you accidentally paint with the wrong color, let it dry completely before covering it with the correct shade.
When your masterpiece is finished and fully dry, seal it with a clear acrylic varnish to protect it from dust and sunlight. Choose a glossy finish for bold, shiny colors or a matte option for a more subtle, gallery-style look.
Conclusion
Turn your cherished photos into personalized paint-by-numbers artwork by choosing a high-resolution, well-lit image, enhancing its contrast and focus, and uploading it to Paint by Numbers Online to create your custom kit. Once your kit arrives - complete with a pre-numbered linen canvas, perfectly matched acrylic paints, and precision brushes - you’ll be ready to transform your memory into a piece of art, one brushstroke at a time.
This isn’t just about decorating your walls; it’s about preserving a meaningful moment in a way that’s both creative and deeply personal. Whether it’s a portrait of your pet, a wedding snapshot, or a favorite travel memory, you’re crafting something that’s uniquely yours.
"By the end of this guide, you won't just have a painting; you'll have a story. You'll have a piece of art infused with personal meaning that you created yourself - a unique intersection of memory, creativity, and personal accomplishment." – Paint-by-number.com
Beyond the finished canvas, this hobby offers a chance to slow down, unwind, and reconnect with what truly matters. It’s a blend of creativity and modern design that transforms fleeting digital images into lasting keepsakes.
Ready to create your masterpiece? Visit Paint by Numbers Online and bring your favorite photo to life.
FAQs
What if my photo is too low-quality to use?
If your photo lacks quality, opt for a higher-resolution image to achieve sharper details and improved clarity. Aim for images that are at least 500 pixels wide to get the best results. Low-quality photos often result in paintings with less detail, so choosing a crisp, well-defined image is key to creating a stunning final piece.
How do I choose between 24, 36, and 48 colors?
When choosing between 24, 36, or 48 colors for your paint-by-numbers project, consider the level of detail you want and your painting experience. Choosing 36 or 48 colors allows for finer details and more vibrant results, but it can take longer and requires extra patience. On the other hand, opting for 24 colors simplifies the process, making it faster and better suited for beginners or anyone looking for a more relaxed painting experience.
Can I fix mistakes or cover numbers that show through?
If you make a mistake or need to cover up numbers in your paint-by-numbers artwork, don’t worry - it’s fixable! If you accidentally use the wrong color, let the paint dry completely before applying the correct shade over it. For numbers that still show through the paint, wait until the area is dry and then add extra layers of paint as needed. With patience and careful layering, you can create a smooth and polished finish.